Developing an iOS 7 Edge
9. Unit Testing on Steroids

IN THIS CHAPTER
- XCTest Framework
- Workspace and Build Schemes
- Test Navigator Awesomeness
- Assistant Editor for Testing
- Commandline Testing
- Testing with Xcode Service
Along with all of the other updates to iOS 7, Apple has also been busily updating the developer tools to make building and unit testing your apps easier than ever before. In the previous chapter, we discussed setting up a Continuous Integration environment using the Xcode Service on OSX Server and getting a build running. In this chapter, we will discuss how to get Unit Tests up and running in Xcode so that you can take advantage of automated testing and give your poor tired QA testers a bit of break.
Xcode Enhancements
Whether you are a testing aficionado or just getting started with unit testing, the latest version of Xcode 5 is going to make you smile. Xcode 4 made an incremental improvement to the testing capabilities by integrating Test Targets and OCTest right into the IDE to make configuring and running your tests much easier than it was in Xcode 3 (program arguments!!?? uggh). Xcode 5 builds upon this and introduces a full-fledged Test Navigator, a new XCTest framework, and new command line options for xcodebuild to run your tests against multiple devices.
In addition to that, the Xcode Service that is part of OSX Server adds the ability to create bots that will run your tests against a variety of simulators or connected devices automatically and provides a nice UI with a testing pane that will aggregate the results of all of the test output. See the section on Build Improvements and Continuous Integration to see more about this.
What is XCTest?
XCTest is a new framework delivered with Xcode that is derived from OCUnit, but has been modernized and extended to allow for many improvements to the Xcode IDE (Test Navigator, etc.) and Continuous Integration processes. When you create an XCTest bundle target and add it to your app, it will build an .xctest bundle and inject a test runner into your app that will load the proper libraries and test bundles to run your unit tests.
Tests that use XCTest can coexist in a project with tests that utilize OCUnit and they can even be run together as part of the same build schemes, but they must be separate targets. OCUnit tests can also be converted to XCTest by using the Refactor->Convert to XCTest command if you desire.
Note: XCTest can only be run against iOS 7 simulators and devices, so you may still need to keep your OCUnit tests around in order to get good test coverage across various SDKs if your app is deployed against more than just the latest and greatest iOS.
Getting Started
To get unit tests up and running for your app, you will need to do a bit of configuration work to your Xcode project. For purposes of this chapter, I will walk through the configuration of the BepBop sample app so that you can make similar changes to your app.
First things first, you well need a workspace with a project and an executable app that builds and runs on at least one simulator. If you want to run on a device you will also need to make sure you have a valid Apple developer account, development certificates, and a properly configured provisioning profile. The Apple App Distribution Guide has lots of information about how to get this all together. Once you have all that, then you are ready to begin testing your app.
Test Targets
Newly created projects in Xcode 5 automatically create a Test build target and stubbed unit tests, so if you just created your project you may already be ahead of the curve. If you have an existing project, you will need to create them yourself.
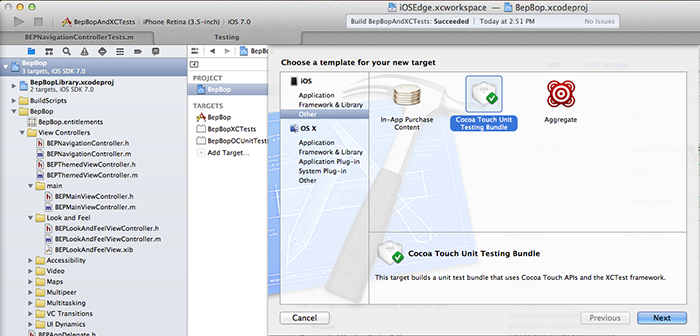
- Select your project in the Project Navigator.
- On the Build Settings page, Click Add Target and select the Cocoa Touch Unit Testing Bundle.
- Fill in the details and select which testing framework you would like to use, and finish.
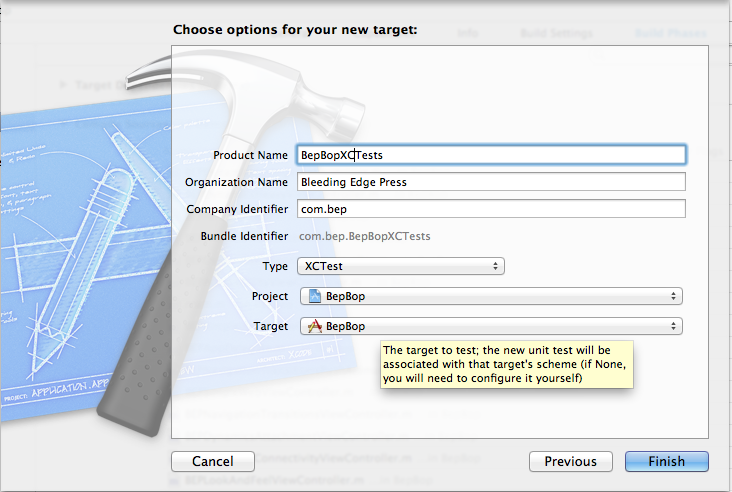
Assuming that completed properly then you will have a new target listed in on the build settings page. This target will have also be added to the BepBop build scheme (as selected in the options).
Depending upon the complexity of your project and setup you may need to configure a few other things in the build settings. For the sample BepBop application, since it uses the BepBopLibrary shared library project, settings for the header search paths, framework search paths, and Objective-C linker flags were also required in order to get the project to build and run. When adding new targets, you may need to also make additional configuration changes to your app if you have a more complicated setup like the BepBop project does.
Build Schemes
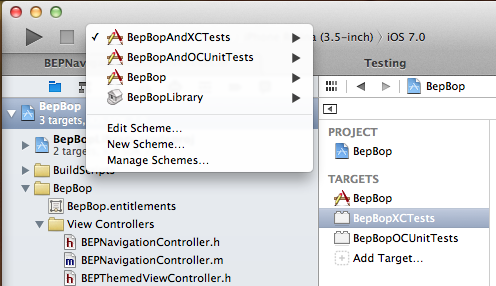
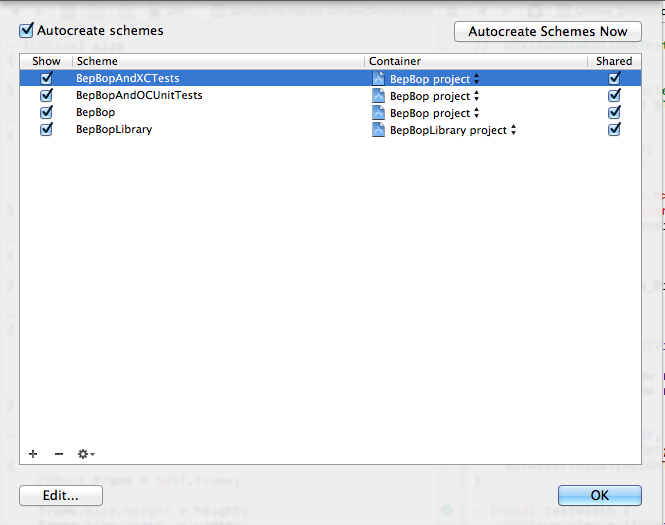
Since XCTest is only supported on iOS7 Simulators and Devices, the BepBop project actually defines several schemes to make sure that we can run the XCTests as well as OCUnit tests. If you take a look at the Manage Schemes pane you will see four schemes that are defined.
- BepBop - builds the BepBop app and BepBopLibrary as a dependency (any IOS SDK), testing phase runs all tests (IOS 7 only!).
- BepBopLibrary - builds the BepBopLibrary and also has the BepBopLibraryTests target as a part of the testing phase.
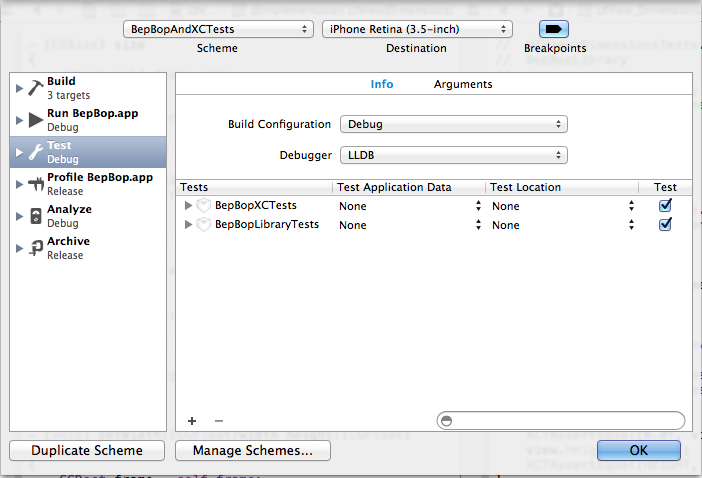
- BepBopAndXCTests - #1 build and includes the BepBopAndXCTests target as well as the BepBopLibraryTests targets for testing.
- BepBopAndOCUnitTessts - #1 build and includes the BepBopOCUnitTests target in the testing phase.
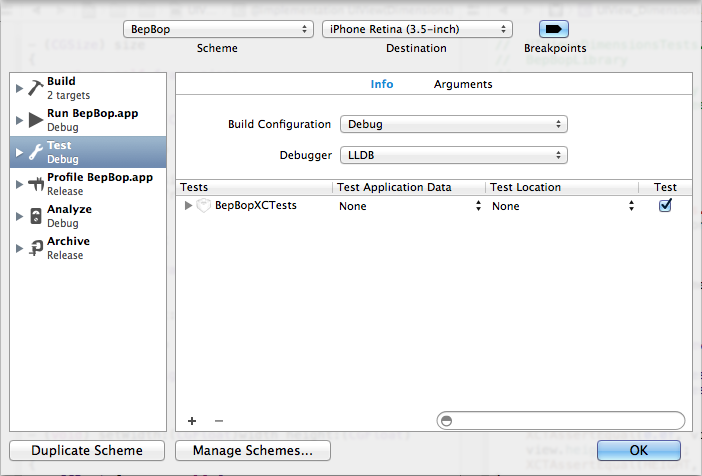
As you can see here, BepBopAndXCTests have two test targets that will be run when a testing phase is initiated.
The schemes are also all marked as shared schemes so that they can be used by other developers and/or a Continuous Integration process.
At this point, you can select which scheme and destination you want and tests can now be run from the Product->Test menu opton (or cmd-U).
Note: Xcode will not prevent you from selecting a pre-iOS7.0 destination when you are using a scheme that includes an XCTest target. If you make this mistake you will see an error like this one in the console and the simulator will hang.
0001:2013-09-15 12:33:52.839 sim[30872:303]
0002: /Applications/Xcode.app/Contents/Developer/Platforms/iPhoneSimulator
0003:.platform/usr/bin/sim: Did not find an executable file at the path:
0004:'/Applications/Xcode.app/Contents/Developer/Platforms/iPhoneSimulator
0005:.platform/Developer/SDKs/iPhoneSimulator6.1.sdk/Developer/usr/bin/xctest'
Xcode Test Navigator
In previous versions of Xcode, running tests was an all or nothing event. If you have a large project and a lot of tests you may spend a lot of time waiting for the complete test cycle when all you really need or want to do is run the tests for a particular class or method. In Xcode 5, the Test Navigator is a nice addition to the IDE and it will no doubt help to alleviate this problem by allowing you to selectively run tests for a project, class, or even individual methods.
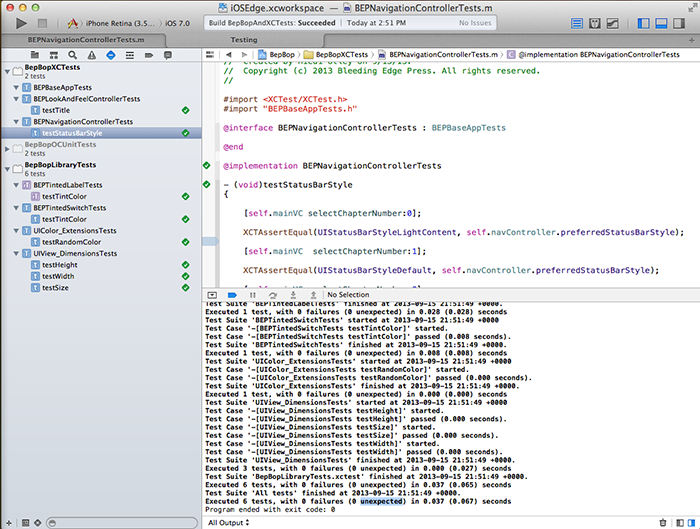
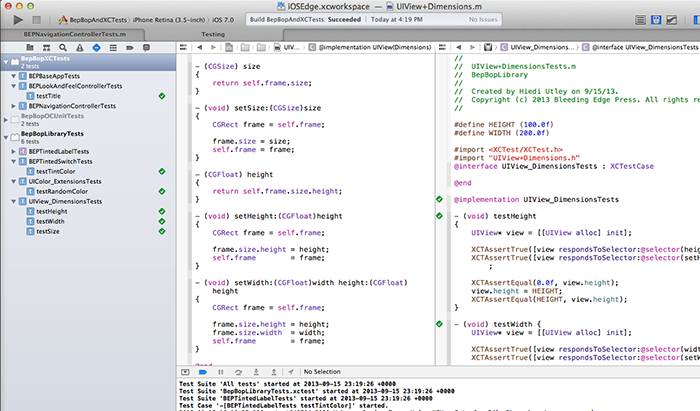
The screenshot below shows the Test Navigator after a successful run of the BepBopAndXCTests scheme. As you can see, the Test Navigator is on the left with a listing of all of the test targets that are included in the workspace. The targets that are included in the scheme used for the last test run are bolded and one that are excluded are disabled.
The navigator shows each test target with each test class and each test method listed in a tree structure so that you can pinpoint which specific tests have passed or failed based on the icons that are inline - in this case they all succeeded and you see all green checkmarks to indicate that.
In the editor pane, there are also the same green checkmark icons to the left of the code that indicate that the test passed and is positioned right next to the actual test. Each icon is clickable and will re-run that portion of the tests. If you hover over an entry in the Test Navigator a run icon will also appear and you can run individual or groups of tests, test classes, or entire targets.
Assistant Editor
In addition to the awesomeness of the Test Navigator, the Assistant Editor now also has additional options to help you to see your test code right alongside your app code. If you switch to the Assistant Editor, on the right hand side you can select the options dropdown and see that there are two new categories - Test Classes and Test Callers.
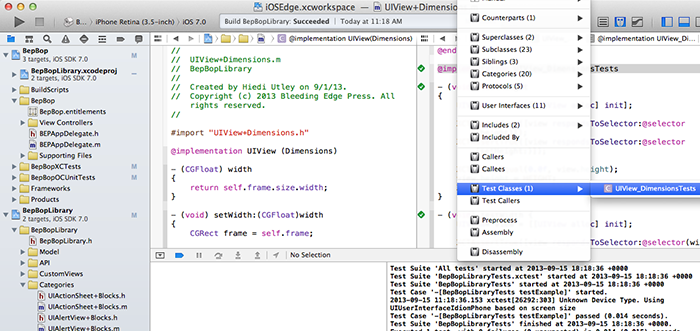
Selecting Test Classes will show you which classes reference your selected class. If you have more than one test class referencing your class then you can choose which file to open first.
Once you have your code and tests side-by-side it makes it very easy to write and test your code at the same time.
Commandline Testing
All of these new Xcode IDE improvements are enabled because of improvements and additions to xcodebuild. One notable improvement is the addition of a -destination flag for specifying which simulators and devices to run against. The man page for xcodebuild specifies the format of the provided destination string and states that if no destination is provided that a default will be selected for the build scheme.
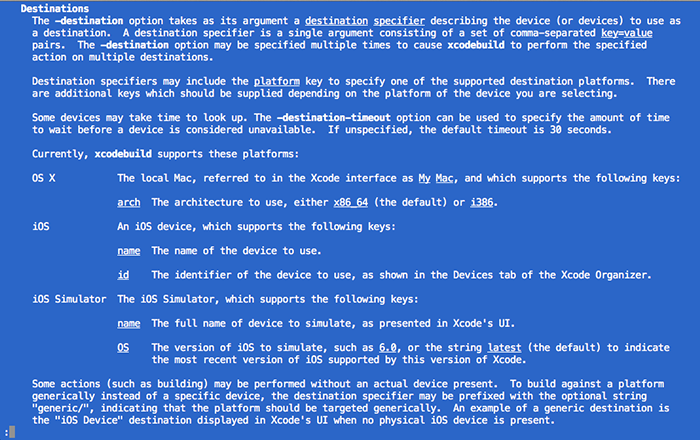
The destination specifier has to be in a particular format and has to be valid for the scheme that you are trying to build and test against.
For reference these are the valid name parameters for the simulators that are available in Xcode 5:
- "iPad"
- "iPad Retina"
- "iPhone"
- "iPhone Retina (3.5-inch)"
- "iPhone Retina (4-inch)"
- "iPhone Retina (4-inch 64-bit)"
Example Usage
0001:xcodebuild -workspace 'iOSEdge.xcworkspace' -scheme 'BepBopAndXCTests'
0002: -destination "platform=iOS Simulator,name=iPhone,OS=7.0"
All of the BepBop schemes can be run from the commandline. In the sample BepBop app there is a build.sh file that shows sample commandline arguments to run each scheme. In order to make sure that your build and tests will run in a Continuous Integration environment properly, you should make sure to run each scheme from the commandline for various configurations (Debug, Release, Adhoc, etc.).
Running Tests with the Xcode Service
Once you have everything building and testing via the commandline, you can configure the Xcode Service and run your tests as part of a Continuous Integration environment build. See the section on Build Improvements and Continuous Integration to see how to do this.
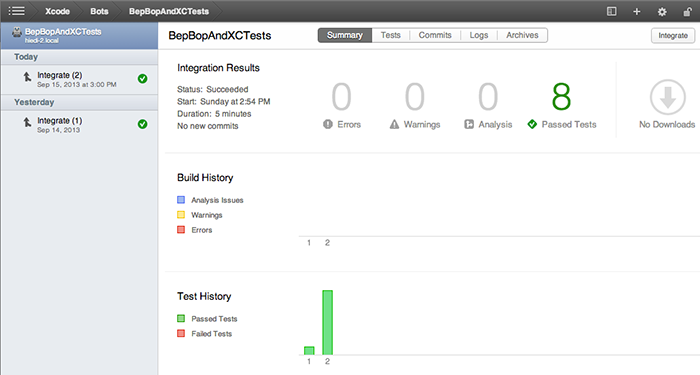
The Xcode Service that is available as part of OSX Server (Mavericks) provides a Bots UI with a Test pane for viewing aggregated results of your build and test runs for each Bot.
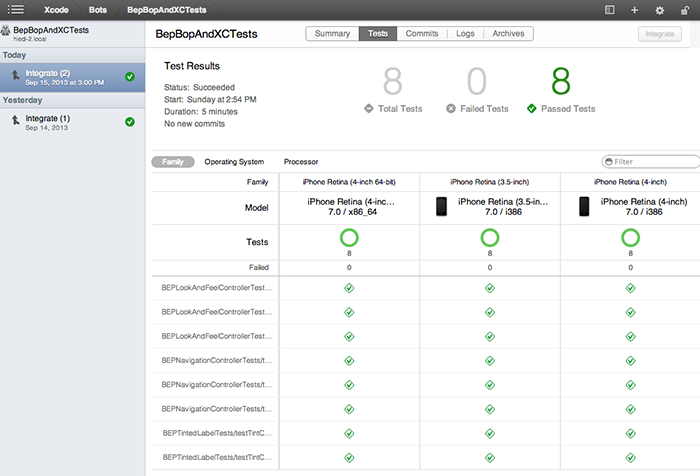
Each integration cycle also has more detail about the success or failure of the tests on each device or simulator on the Tests pane.
Summary
In this chapter, we covered how to use the new Test Navigator and Assistant Editor options to supercharge your unit testing development cycle. We also covered how to automate running those tests through the commandline as well as the Xcode Service Bots. Now get out there and write some tests!