Developing an iOS 7 Edge
7. Accessibility in iOS 7

IN THIS CHAPTER
- Why Accessibility?
- Dynamic Type
- Text to Speech
In this chapter, we'll talk about Apple's accessibility improvements to iOS 7 and some new APIs they've introduced. Designing for accessibility is essential to every app. The iPhone is designed with accessibility in mind, including technologies like VoiceOver to help those with visual impairments as well as settings for text size, screen zoom, and more, allowing those with low vision to better see and interact with your app's user interface.
Why Accessibility?
Apple has built Accessibility APIs in to iOS, and they make it really easy to support accessibility in your app. Not only should you do it because it's easy, but because it's profitable and widens your reach, as iOS accessibility expert Charles Perry says:
"Building accessible apps is a great way to maximize your audience. It opens the door to enterprise and government sales, it widens your pool of potential customers to include millions of people with disabilities, and it shows prospective clients that you care enough about your software and your customers to sweat the details."
World-famous musician Stevie Wonder, who's been blind since birth, once thanked Steve Jobs for making the iPhone accessible, saying:
"I want you all to give a hand to someone that you know whose health is very bad at this time…. His company took the challenge in making his technology accessible to everyone. In the spirit of caring and moving the world forward: Steve Jobs. Because there’s nothing on the iPhone or the iPad that you can do that I can’t do. As a matter of fact, I can be talking to you, you can be looking at me, and I can be doing whatever I need to do and you don’t even know what I’m doing. Yeah!"
Apple has included support for VoiceOver and accessibility APIs since iOS 3.0. In case you haven't looked at VoiceOver yet, here's a brief overview:
"Using iOS 3.0 and later, VoiceOver is available to help users with visual impairments use their iOS-based devices. The UI Accessibility programming interface, introduced in iOS 3.0, helps developers make their applications accessible to VoiceOver users. Briefly, VoiceOver describes an application’s user interface and helps users navigate through the application’s views and controls, using speech and sound." - Accessibility Programming Guide for iOS
The built-in support for VoiceOver in iOS makes it ridiculously simple for developers to make their apps easy to use for those with visual impairments. In iOS 7, Apple introduces new APIs that allow developers to make apps even more accessible, including Dynamic Type and Text to Speech.
Dynamic Type
While Dynamic Type isn't exactly part of Apple's new Accessibility APIs, it is new in iOS 7, and it does make iOS more accessible to those who have trouble seeing smaller text. If your apps support Dynamic Type, users can configure their preferred text size one time in the Settings app and have it apply to all apps that support it. This does require a bit of effort on your part as the developer, but we'll see that it's fairly simple and straightforward to do.
With Dynamic Type, your app can respond to the user's choice in text size. This is useful not only for users with low vision, but also for general users who just prefer a larger or smaller text size across all apps. Apple's built-in apps like Mail and Calendar support Dynamic Type, and your apps should, too.
When your app is set up to listen for changes in the user's preferred text size (Dynamic Type), you get automatic adjustments to weight, letter spacing, and line height for every font size.
You can listen for the UIContentSizeCategoryDidChangeNotification.
Dynamic Type give us six text styles to choose from. You get to choose from a Headline, Body, Subheadline, Footnote, and two types of Captions.
- UIFontTextStyleHeadline
- UIFontTextStyleBody
- UIFontTextStyleSubheadline
- UIFontTextStyleFootnote
- UIFontTextStyleCaption1
- UIFontTextStyleCaption2
For our BepBop project, we'll go with a headline, subheadline, body, and footnote. You'll find plenty of uses for these types in your own apps. Here, we're going to display an article from Apple's hot news feed.
Building a view that supports Dynamic Type
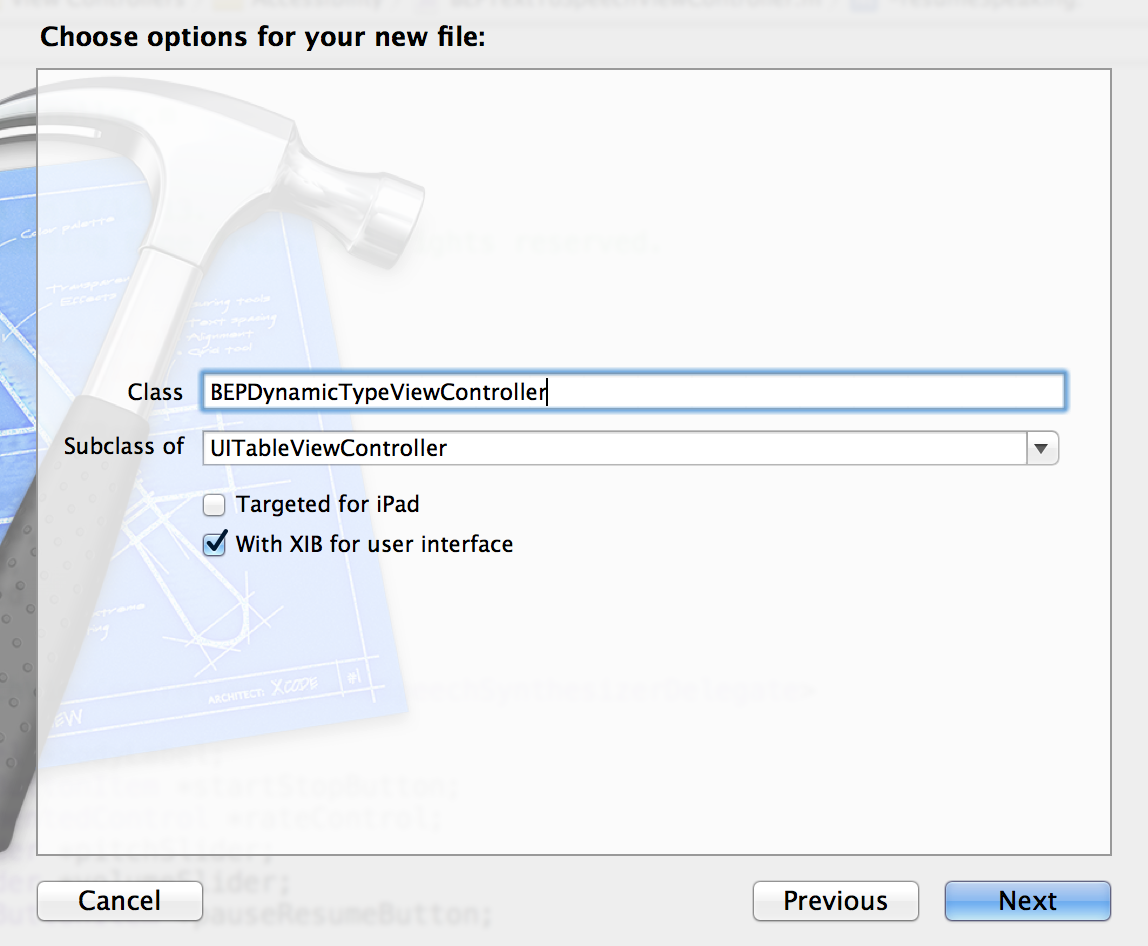
Let's create that view in Interface Builder. Start by creating a new view controller. We're calling ours BEPDynamicTypeViewController, but feel free to call yours whatever you'd like.
To create the new view controller, click File > New > File (or ⌘N). On the new screen, choose Cocoa Touch, Objective-C class, then click Next. On this screen, enter the name BEPDynamicTypeViewController, make it a subclass of UIViewController, check the box for With XIB for user interface, then click Next.
On the following screen, make sure it's included in the right group (BepBop, View Controllers, Accessibility) and that it's added to our BepBop target. Then click Create.
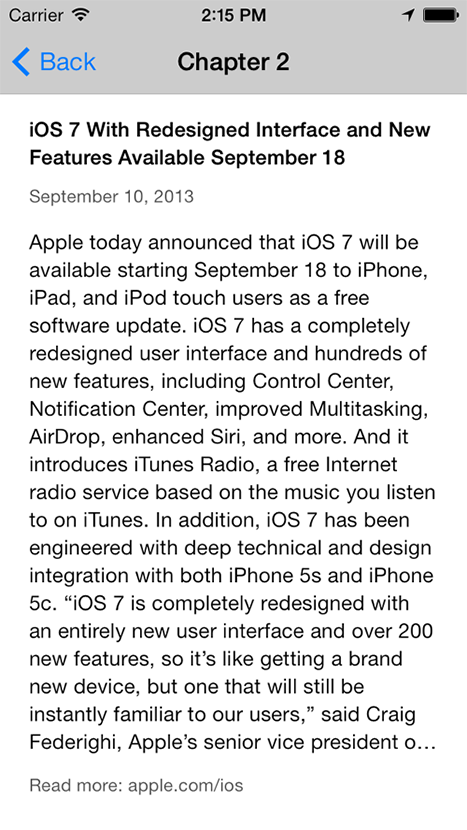
Now let's go to BEPDynamicTypeViewController.xib and build our view. We'll drag out four labels - one for the headline, one for the subhead where we'll show the date, one for the body of the article, and one for the footer that shows the "Read More" link. We'll also tell Interface Builder to simulate a navigation bar since we know that'll be there in our app.
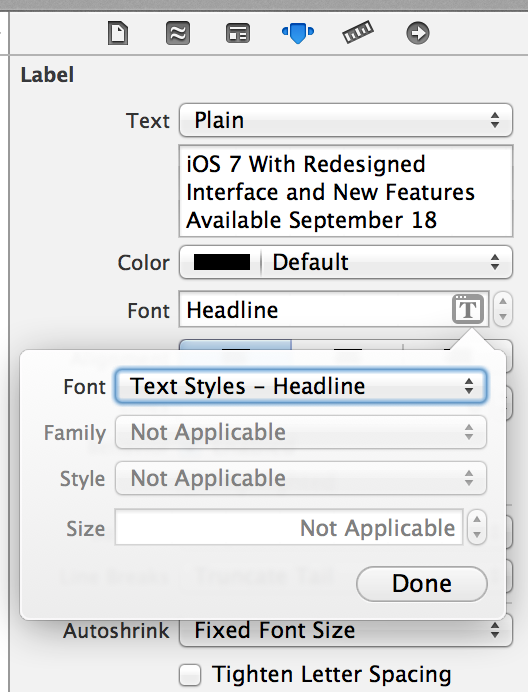
The next step is to configure each label with text and the appropriate text style. In Interface Builder, this is quite simple. Let's start with the headline label:
- Drag a label onto the view for the headline.
- Double-click on it to set the text. We'll set the text to "iOS 7 With Redesigned Interface and New Features Available September 18".
- With the label still selected, find the Font in the Attributes Inspector (in the Utilities pane on the right). Click the 'T' button, then set the font to Text Styles - Headline.
Repeat steps 1-3 for the subheadline label, the body label, and the footer label, choosing the appropriate text styles for each (Subhead, Body, and Footnote).
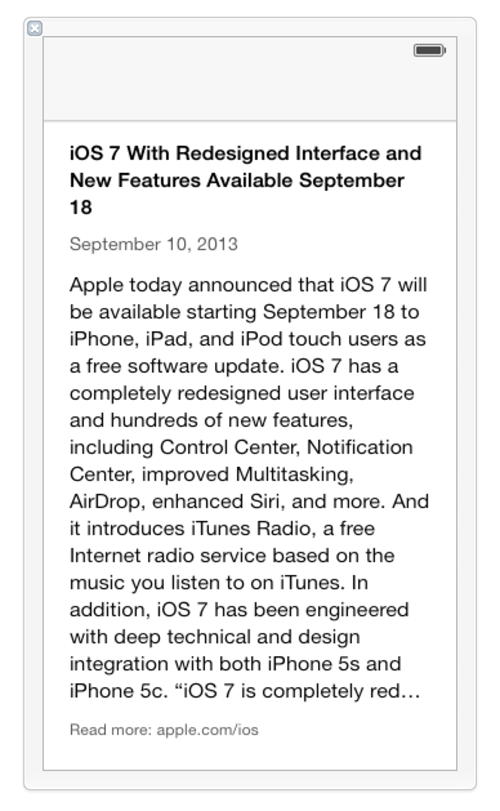
When it's all done, our view should look like:
Unfortunately, configuring our view to support dynamic type isn't quite that simple. We'll actually need to write some code to size the text appropriately whenever the user changes the text size in the Settings app. To do that, we need to listen for a notification for the change in the preferred font size. The notification is called UIContentSizeCategoryDidChangeNotification, and we'll add our listener in our viewDidLoad:
0001:    [[NSNotificationCenter defaultCenter]
0002:     addObserver:self
0003:     selector:@selector(handleContentSizeDidChange:)
0004:     name:UIContentSizeCategoryDidChangeNotification
0005:     object:nil];
Here, we're just adding an observer that's listening for the change in text size - the UIContentSizeCategoryDidChangeNotification. And when we do observe that notification, we're going to call -[self handleContentSizeDidChange:] which will actually change the text style on our labels.
So now that we're listening for changes in text size, we need to actually respond to those changes when we receive the notification. When the user chooses a new font size, we can use `+[UIFont preferredFontForTextStyle:]` to get a font that's sized to the user's preference. You'll pass in the text style you want, choosing from the text styles listed previously. In our case, we're going to pass in either the Headline, Subheadline, Body, or Footer, depending on which label we're getting a font for. Below is our method that responds to the change in text size. It's important to note that this code *is* necessary - iOS does not do this automatically when you set the font to one of the Text Styles in Interface Builder. Here's that method:
0001:- (void) handleContentSizeDidChange:(NSNotification*)aNotification
0002:{
0003:    self.headlineLabel.font = [UIFont preferredFontForTextStyle:UIFontTextStyleHeadline];
0004:    self.subheadLabel.font = [UIFont preferredFontForTextStyle:UIFontTextStyleSubheadline];
0005:    self.bodyLabel.font = [UIFont preferredFontForTextStyle:UIFontTextStyleBody];
0006:    self.footnoteLabel.font = [UIFont preferredFontForTextStyle:UIFontTextStyleFootnote];
0007:}
0008:
First we set the font for the headline label to the user's preferred font for the Headline text style. Then we set the font on the subhead label to the user's preferred font for Subheadline text style. Next we set the body label's font to the user's preferred font for the Body text style. And finally, we set the footnote label's font to the user's preferred font for the Footnote text style.
Now let's test this. Run the app and navigate to your Dynamic Type view. When you get there, make sure everything seems to be appropriately sized.
Changing the Dynamic Type text size
Now we need to change the text size to see our view update in response to a text size change. To set the text size:
- Launch the Settings app
- Select General > Text Size
- Drag the slider to adjust the text size
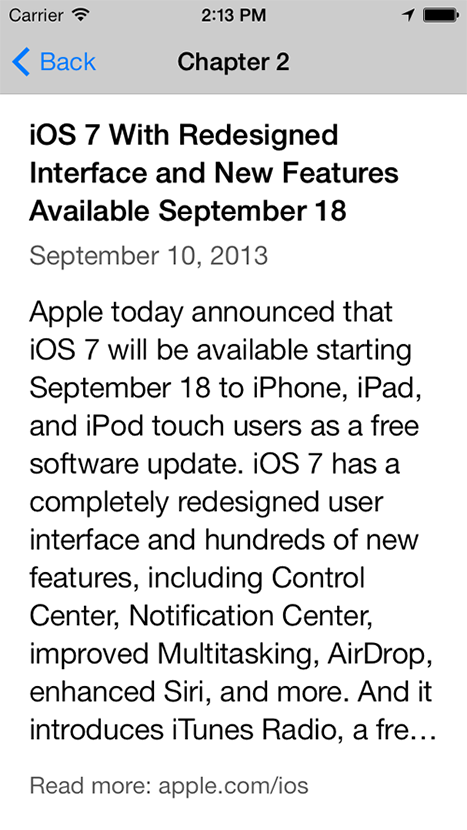
First let's test it by sliding the size all the way up. Do that using the steps above, then go back to your app. Does your view look something like the following?
Now let's go back to the Settings app and make the text size as small as possible. Go do that, again following the steps above, then go back to your view. It should look about like this:
Note that the user can also choose to make the font bold in the Accessibility Settings (Settings app > Accessibility > Bold Text) so be sure to test this as well.
Autolayout in Xcode 5
Having our view dynamically size the text is great, but without laying out the views in response to changes in text size, our app isn't going to look very nice when the user resizes the text. Let's fix that problem now.
You may have noticed in your app that the views were positioned strangely after changes in text size. Autolayout can fix that for us. Let's look at our view in Interface Builder.
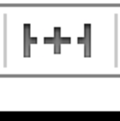
Select the headline label in Interface Builder, then in the bottom right of the canvas, choose the second icon from the left, which should look like a plus sign between bars, like this:
Configure the Autolayout constraints in this view by clicking the red bars to set the top, left, and right constraints. We also want to constrain the width to 280. When it's all said and done, it should look like this:
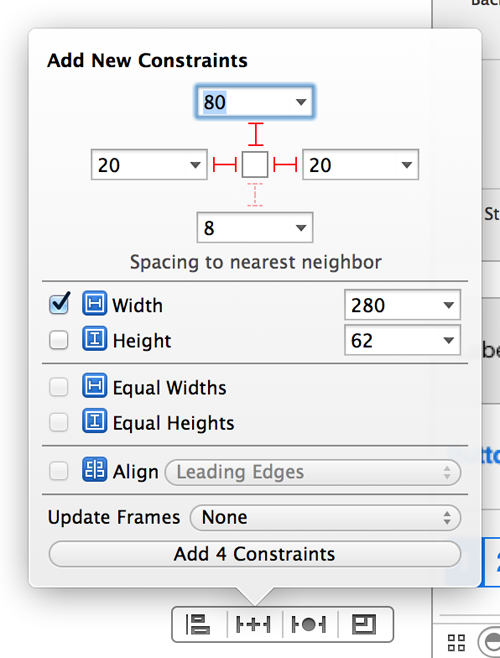
Click the Add 4 Constraints button to add the constraints.
We'll want to similarly constrain the other labels. We want them relative to each other, though, rather than the top of the view. Xcode is pretty smart about this, however, so clicking the red bars for top, right and left as well as checking the Width box on the subheadline and body labels should do the trick.
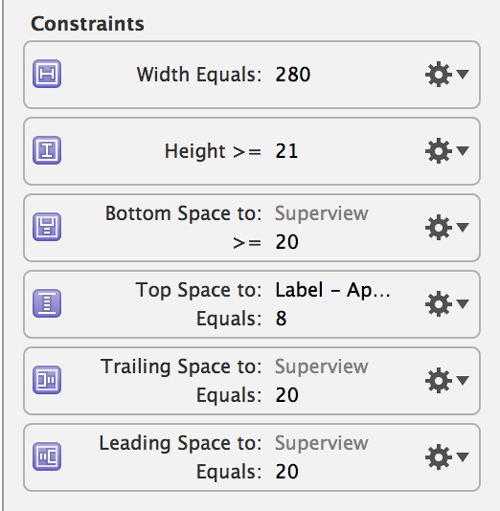
For the footer label, we want to make sure it stays on the screen. We don't want the other views to push it off as they increase their height to fit a larger text size. And we'll let the body be truncated if it's too big to fit in the view, in favor of keeping the Read More label on the screen. We can do that by setting its height >= 21 and setting its bottom space constraint to be >= 20 pixels above the superview. And it's top space should be 8 pixels below the body. Below is a screen shot of what all of its constraints should look like. You can find these in the Utilities pane on the right, in the Size inspector.
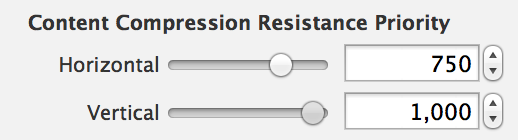
You may have also noticed that the headline view truncates its text when the text size is large. We don't want this - we want to be able to see all the text in the headline - we can live with the body label being squished and the body text being truncated, but the headline should be visible. The way to do that is by setting the compression resistance on the headline label. With the headline label selected, look in the Size Inspector for the Content Compression Resistance Priority. Here, we want to set the Vertical to 1,000, telling iOS that we never want this label to be compressed vertically. Setting the priority to 1,000 makes it Required, so we can be sure that it won't be compressed. Here's how that looks:
Text to Speech
Many apps already use text to speech, and until now, they've had to roll their own synthesizer and include a large bundle in the app. In iOS 7, Apple has introduced a Text to Speech API, so developers can quickly and easily take advantage of Text to Speech in their apps with only a few lines of code. It's really simple. Let's have it say hello to you, so put in your name in place of Troy:
0001:    AVSpeechSynthesizer *synthesizer = [[AVSpeechSynthesizer alloc] init];
0002:    AVSpeechUtterance *utterance = [AVSpeechUtterance speechUtteranceWithString:@"Hello, Troy!"];
0003:    [synthesizer speakUtterance:utterance];
To get this to run, you'll need to add AVFoundation.framework to your project and #import <AVFoundation/AVFoundation.h> in your implementation file.
The three lines above are enough to have iOS say hello to you, but there's so much more you can do. The API also allows you to configure the voice, volume, pitch, rate, and more. You can also start, stop, pause, and resume speech with the APIs. This makes it trivial to add a few buttons that control these and have iOS speak to you. Let's do that now. Here's what we're shooting for:
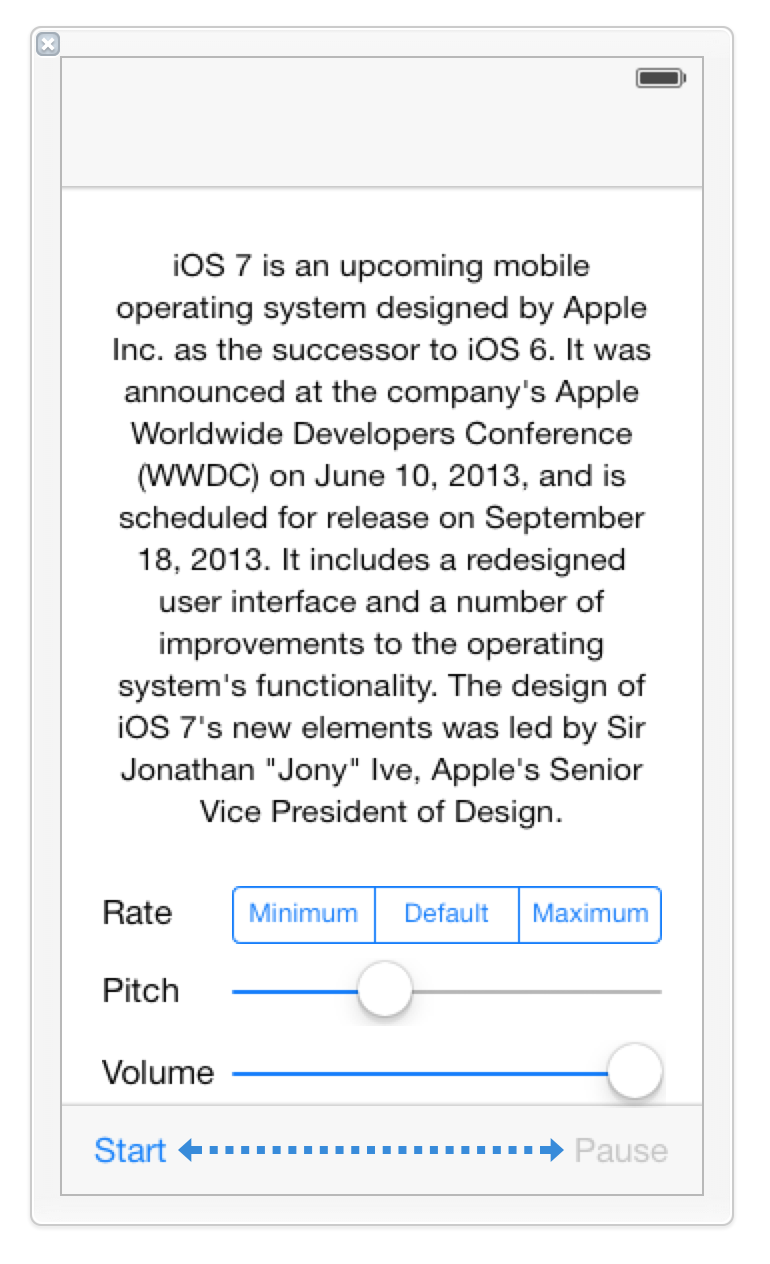
You can use any text you want for the label (or you could do this entirely without a label), but we've chosen our sample from Wikipedia's iOS 7 page.
Configuring the speech rate, pitch, and volume
The Rate segmented control sets the rate at which iOS reads the text. The three values pictured are provided by Apple as constants, but the rate is actually just a float whose value is between AVSpeechUtteranceMinimumSpeechRate (or 0) and AVSpeechUtteranceMaximumSpeechRate (or 1), meaning you could set your own value. The default (AVSpeechUtteranceDefaultSpeechRate) is set to 0.5. Setting the rate is simple:
utterance.rate = AVSpeechUtteranceMaximumSpeechRate;
With the code above, we're just setting the rate to the maximum. But since we have a control for setting the rate, our code is a bit more complex:
0001:    CGFloat rate = AVSpeechUtteranceDefaultSpeechRate;
0002:    switch (self.rateControl.selectedSegmentIndex)
0003:    {
0004:        case 0:
0005:            rate = AVSpeechUtteranceMinimumSpeechRate;
0006:            break;
0007:        case 1:
0008:            rate = AVSpeechUtteranceDefaultSpeechRate;
0009:            break;
0010:        case 2:
0011:            rate = AVSpeechUtteranceMaximumSpeechRate;
0012:            break;
0013:        default:
0014:            break;
0015:    }
0016:    utterance.rate = rate;
0017:
In this case, we're just switching on the selected segment of the segmented control and setting the rate to the corresponding value. No surprises here.
The Pitch slider controls the pitch multiplier of the voice, which controls how high or low the pitch of the voice is. Values for this range from 0.5 for the lowest pitch to 2.0 for the highest. The default pitch is 1.0. We've configured our slider to only allow these values, and set its default to 1.0. Here's our code that sets the pitch:
utterance.pitchMultiplier = self.pitchSlider.value;
The Volume slider controls the volume of the voice. Values range from 0 to 1 for this, where 0.0 is silent and 1.0 is the loudest possible. The default value here is 1.0, so we've configured our slider accordingly. Below is the code that sets the volume:
utterance.volume = self.volumeSlider.value;
The voice can also be configured on the utterance, so if you'd like to change the voice for a different language or region, that's an option as well. For English, there are several options:
0001:en-GB
0002:en-US
0003:en-AU
0004:en-IE
0005:en-ZA
0006:
Here's an example of how to set the voice:
utterance.voice = [AVSpeechSynthesisVoice voiceWithLanguage:@"en-GB"];
We've chosen to have the voice talk to us in British English, but you're free to choose any language and region you like. Since our text is in English, we'd recommend trying one of the English voices. :) Note that if you don't set the voice on the utterance object, it'll use the default based upon your region and language settings, so there's no need to configure this property.
The rate, pitch, volume, and voice are properties on the AVSpeechUtterance object and can only be configured before asking the synthesizer to speak the utterance. And it's worth pointing out that you can't change the AVSpeechUtterance's string - it's readonly.
Starting, stopping, pausing, and resuming speech
Let's now examine how to stop, start, pause and resume speech in our app.
Starting and stopping speech synthesis
Now let's look at how to start and stop speech with the AVSpeechSynthesizer. It's quite simple, really, thanks to Apple's wonderful APIs. Here are the methods we'll use:
0001:- (void)speakUtterance:(AVSpeechUtterance *)utterance
0002:- (BOOL)stopSpeakingAtBoundary:(AVSpeechBoundary)boundary
Yep, it's really that simple. Let's look at the first - starting the speech synthesizer. Here's how to do it:
0001:AVSpeechUtterance *utterance = [AVSpeechUtterance speechUtteranceWithString:@"Hello, there!"];
0002: [synthesizer speakUtterance:utterance];
As we've seen before, we just need to create an utterance with a string and ask the synthesizer to speak it. Stopping is just as easy:
[synthesizer stopSpeakingAtBoundary:AVSpeechBoundaryImmediate];
In the above line, we're asking the synthesizer to stop speaking immediately, canceling the current utterance and removing any others from the synthesizer's queue* (see The Synthesizer's Queue). Another option for the boundary parameter is AVSpeechBoundaryWord, which asks the synthesizer to stop speaking after the word that's currently being spoken.
Aside: The Synthesizer's Queue
The AVSpeechSynthesizer has a queue, so whenever we call its `-speakUtterance:` method, the utterance we pass to it is added to the synthesizer's queue. If it's the only utterance in the queue, the synthesizer starts speaking it immediately. If there are other utterances in the queue, the utterance we pass will be spoken when the other utterances finish and it gets to the beginning of the queue. So if we want the synthesizer to say hello and ask how we're doing, we could do it like this:
0001:AVSpeechUtterance *helloUtterance = [AVSpeechUtterance speechUtteranceWithString:@"Hello, there!"];
0002: AVSpeechUtterance *howAreYouUtterance = [AVSpeechUtterance speechUtteranceWithString:@"How are you?"];
0003: [synthesizer speakUtterance:helloUtterance];
0004: [synthesizer speakUtterance:howAreYouUtterance];
It's important to note that the howAreYouUtterance gets queued - it doesn't speak over or cut off the helloUtterance. A use case for this might be an app that allows children to build sentences by arranging words (or images) in order. When they tap the "speak" button, you could take the words they've arranged and call `-speakUtterance:` with an utterance for each string, rather than having to concatenate each string into a single utterance.
Let's move on to pausing and resuming speech.
Pausing and resuming speech synthesis
Next up, we'll look at pausing and resuming speech on the AVSpeechSynthesizer. We'll need the following two methods.
0001:- (BOOL)pauseSpeakingAtBoundary:(AVSpeechBoundary)boundary
0002:- (BOOL)continueSpeaking
Let's start with the first - pausing speech. Here's a sample of how we can pause speech at the end of the word that's currently being spoken:
[synthesizer pauseSpeakingAtBoundary:AVSpeechBoundaryWord];
On our synthesizer instance, we ask it to pause speaking at the word boundary. The other option is to request for it to stop speaking immediately, passing `AVSpeechBoundaryImmediate` for the boundary.
Getting notified about speech starts, stops, pauses, and resumes
The AVSpeechSynthesizerDelegate protocol defines methods that allow the delegate of AVSpeechSynthesizer to be notified when the synthesizer pauses or resumes, starts or finishes a block of text, or as it produces each individual unit of speech. For our purposes, we'll look at pausing, resuming, starting, and finishing.
Let's start with the method that gets called when speech starts:
0001:- (void)speechSynthesizer:(AVSpeechSynthesizer *)synthesizer didStartSpeechUtterance:(AVSpeechUtterance *)utterance
As you can see, we get a reference to the synthesizer and the utterance in this delegate method. In our case, we want to set up our view for the started state:
0001:- (void)speechSynthesizer:(AVSpeechSynthesizer *)synthesizer didStartSpeechUtterance:(AVSpeechUtterance *)utterance
0002:{
0003: [self setViewForState:BEPReadingStateStarted];
0004:}
We've defined an enum that tells us which state we're in, and we're asking our setViewForState method to get our view in order for the "started" state. Let's take a look at that method.
0001:- (void) setViewForState:(BEPReadingState)state
0002:{
0003: switch (state)
0004: {
0005: case BEPReadingStateStarted:
0006: [self setStartStopButtonToStart:NO];
0007: [self setPauseResumeButtonToPause:YES];
0008: self.rateControl.enabled = NO;
0009: self.pitchSlider.enabled = NO;
0010: self.volumeSlider.enabled = NO;
0011: self.pauseResumeButton.enabled = YES;
0012: break;
0013: case BEPReadingStateStopped:
0014: [self setStartStopButtonToStart:YES];
0015: [self setPauseResumeButtonToPause:YES];
0016: self.rateControl.enabled = YES;
0017: self.pitchSlider.enabled = YES;
0018: self.volumeSlider.enabled = YES;
0019: self.pauseResumeButton.enabled = NO;
0020: break;
0021: case BEPReadingStatePaused:
0022: [self setPauseResumeButtonToPause:NO];
0023: break;
0024: case BEPReadingStateResumed:
0025: [self setPauseResumeButtonToPause:YES];
0026: break;
0027: default:
0028: break;
0029: }
0030:}
0031:
So since we're in the "started" state here, let's focus just on that case. Here's the meaningful code from it:
0001:[self setStartStopButtonToStart:NO];
0002: [self setPauseResumeButtonToPause:YES];
0003: self.rateControl.enabled = NO;
0004: self.pitchSlider.enabled = NO;
0005: self.volumeSlider.enabled = NO;
0006: self.pauseResumeButton.enabled = YES;
First, we want to set the start/stop button to the proper state, and since the state is Started, we want that button to say "Stop". (We'll look at the `-setStartStopButtonToStart:` method a bit later). The next line asks our view controller to set the pause/resume to "Pause". (Again, we'll look at this method later). In the next three lines, we disable the controls for rate, pitch, and volume. Why, you ask? An excellent question, dear reader. Once speech has started, it's impossible to change the rate, pitch, or volume of the voice, so we're showing that in our UI. Finally, we want to enable the pause/resume button, as speech is started now and the user should be able to pause it.
We'll skip over the rest of the cases in the `-setViewForState:` method, as we trust you're able to figure them out based on the breakdown of the first case above. So now let's take a look at that `-setStartStopButtonToStart:` method we glossed over before.
0001:- (void) setStartStopButtonToStart:(BOOL)start
0002:{
0003: if (start)
0004: {
0005: self.startStopButton.title = NSLocalizedString(@"Start", nil);
0006: [self.startStopButton setAction:@selector(startSpeaking:)];
0007: }
0008: else
0009: {
0010: self.startStopButton.title = NSLocalizedString(@"Stop", nil);
0011: [self.startStopButton setAction:@selector(stopSpeaking:)];
0012: }
0013:}
0014:
This is relatively simple, straightforward code that toggles the start/stop button between the start and stop states. If start is YES, we enter the first block of the if statement, setting the title of the button to "Start" and setting the action to `startSpeaking:`. In the else block, we do quite the opposite - the button's title becomes "Stop" and the action for the button becomes `stopSpeaking:`. Onward and upward - let's see those methods.
0001:- (IBAction) startSpeaking:(id)sender<
0002:{
0003: AVSpeechUtterance *utterance = [AVSpeechUtterance speechUtteranceWithString:self.bodyLabel.text];
0004:
0005: utterance.voice = [AVSpeechSynthesisVoice voiceWithLanguage:@"en-GB"];
0006: utterance.volume = self.volumeSlider.value;<br /> utterance.pitchMultiplier = self.pitchSlider.value;
0007:
0008: CGFloat rate = AVSpeechUtteranceDefaultSpeechRate;
0009: switch (self.rateControl.selectedSegmentIndex)
0010: {
0011:case 0:
0012: rate = AVSpeechUtteranceMinimumSpeechRate;
0013: break;
0014: case 1:
0015: rate = AVSpeechUtteranceDefaultSpeechRate;
0016: break;
0017: case 2:
0018: rate = AVSpeechUtteranceMaximumSpeechRate;
0019: break;
0020: default:
0021: break;
0022: }
0023: utterance.rate = rate;
0024:
0025: [self.synthesizer speakUtterance:utterance];
0026:}
Here we have a bit more code, but again it's relatively straightforward. Let's break it down.
0001:AVSpeechUtterance *utterance = [AVSpeechUtterance speechUtteranceWithString:self.bodyLabel.text];
Just create a speech utterance with the bodyLabel's text. Later we'll ask the synthesizer to speak this utterance, but first, let's configure it! How about a British English voice?
utterance.voice = [AVSpeechSynthesisVoice voiceWithLanguage:@"en-GB"];
Creating a voice with a language is quite simple, as you can see - all we need to do is pass it a proper language and localization. To see all of the possible voices, you can call `+[AVSpeechSynthesisVoice speechVoices]` Moving on, let's set the volume of the utterance.
utterance.volume = self.volumeSlider.value;
The volume property on the utterance sets - you guessed it - the volume of the speech. We get the value for the volume from the volumeSlider in the UI, which we've configured in Interface Builder with a minimum value of 0.0 and a maximum of 1.0. And yep, you guessed it, that corresponds with the range of possible values for the utterance's volume. If we don't set the volume, the utterance uses the default value of 1.0. Next up: pitch!
utterance.pitchMultiplier = self.pitchSlider.value;
The pitch multiplier on the utterance sets the pitch of the speech. Again we're getting the value from a slider in the UI. We made sure to configure the pitchSlider in Interface Builder to its minimum and maximum values: 0.5 and 2.0. The pitchMultiplier on the utterance defaults to 1.0, so we've also configured this in Interface Builder. Now we'll look at the rate.
0001:CGFloat rate = AVSpeechUtteranceDefaultSpeechRate;
0002: switch (self.rateControl.selectedSegmentIndex)<
0003: {
0004: case 0:
0005: rate = AVSpeechUtteranceMinimumSpeechRate;
0006: break;
0007: case 1:
0008: rate = AVSpeechUtteranceDefaultSpeechRate;
0009: break;
0010: case 2:
0011: rate = AVSpeechUtteranceMaximumSpeechRate;
0012: break;
0013: default:
0014: break;
0015: }
0016: utterance.rate = rate;
With the switch statement, the code to set the rate looks a bit more complex, but in reality, it's simple. The rate on the utterance is a float and can be a value between 0.0 and 1.0, but Apple provides us with a few constants: AVSpeechUtteranceMinimumSpeechRate, AVSpeechUtteranceDefaultSpeechRate, and AVSpeechUtteranceMaximumSpeechRate. We easily could have made this a slider like the pitch and volume with a range from 0.0 to 1.0, but we opted to illustrate the constants Apple provides. Feel free to set your rate to crazy non-constant values like 0.7 or even 0.125 and see how it works! :)
That brings us to the code that finally starts speech in this method:
[self.synthesizer speakUtterance:utterance];
Now that we've configured our utterance, we just pass it to the synthesizer and ask it to speak. This will cause the synthesizer to start speaking immediately.
Stop delegate method
When the synthesizer delegate notifies us that speech has either finished or been canceled, we only need to set up the view for the stopped state. Here's what the finish method looks like:
0001:- (void)speechSynthesizer:(AVSpeechSynthesizer *)synthesizer didFinishSpeechUtterance:(AVSpeechUtterance *)utterance
0002:{
0003: [self setViewForState:BEPReadingStateStopped];
0004:}
We just call the setViewForState, telling it that the state is now "Stopped." And we've seen the `-setViewForState:` method before, but let's look at the stopped case again:
0001:case BEPReadingStateStopped:
0002: [self setStartStopButtonToStart:YES];
0003: [self setPauseResumeButtonToPause:YES];
0004: self.rateControl.enabled = YES;
0005: self.pitchSlider.enabled = YES;
0006: self.volumeSlider.enabled = YES;
0007: self.pauseResumeButton.enabled = NO;
0008: break;
First we change the start/stop button to "Start" with the call to `-setStartStopButtonToStart`. Then we set the pause/resume button to "Pause" so it's ready for the next time speech is started. We the enable all of the controls that configure the utterance - the rateControl, pitchSlider, and volumeSlider. Since speech is now stopped, we can again allow the user to configure those settings. And finally, we disable the pause/resume button since we can't pause or resume speech when it's stopped. Next up, we'll look at the pause delegate method.
Pause delegate method
In the delegate method that notifies us that speech was paused, we'll ask our view controller to configure the view for our paused state. Here's that delegate method:
0001:- (void)speechSynthesizer:(AVSpeechSynthesizer *)synthesizer didPauseSpeechUtterance:(AVSpeechUtterance *)utterance
0002:{
0003: [self setViewForState:BEPReadingStatePaused];
0004:}
The one line in this method again calls our `-setViewForState:` method, passing in the Paused state. That brings us to the Paused case in `-setViewForState:`:
case BEPReadingStatePaused:
[self setPauseResumeButtonToPause:NO];
break;
And in the `-setPauseResumeButtonToPause:`, we simply set the title and action on our pause/resume button.
0001:- (void) setPauseResumeButtonToPause:(BOOL)paused
0002:{
0003: if (paused)
0004: {
0005: self.pauseResumeButton.title = NSLocalizedString(@"Pause", nil);
0006: [self.pauseResumeButton setAction:@selector(pauseSpeaking:)];
0007: }
0008: else
0009: {
0010: self.pauseResumeButton.title = NSLocalizedString(@"Resume", nil);
0011:[self.pauseResumeButton setAction:@selector(resumeSpeaking:)];
0012: }
0013:}
Since we've called this method with NO for the `paused` parameter, let's look at the `else` block. In it, we first set the title of the pause/resume button to "Resume". Then we set the action to resumeSpeaking, so when the user taps our "Resume" button, we'll do this:
0001:- (void) resumeSpeaking:(id)sender
0002:{
0003: [self.synthesizer continueSpeaking];
0004:}
This method calls the continueSpeaking on our AVSpeechSynthesizer instance, asking it to continue speaking from where it left off when we paused it. That takes us to our continue delegate method, which is what gets called as soon as `-continueSpeaking:` is called in the method above. Let's look at that delegate method:
0001:- (void)speechSynthesizer:(AVSpeechSynthesizer *)synthesizer didContinueSpeechUtterance:(AVSpeechUtterance *)utterance
0002:{
0003: [self setViewForState:BEPReadingStateResumed];
0004:}
And all we do is a single call our `-setViewForState:` method, passing the Resumed state in. Let's look at the case in that method where we handle the Resumed state:
case BEPReadingStateResumed:
[self setPauseResumeButtonToPause:YES];
break;
This asks our view controller to set the pause/resume button to its pause state, so let's look at that now:
0001:- (void) setPauseResumeButtonToPause:(BOOL)paused
0002:{
0003: if (paused)
0004: {
0005: self.pauseResumeButton.title = NSLocalizedString(@"Pause", nil);
0006: [self.pauseResumeButton setAction:@selector(pauseSpeaking:)];
0007: }
0008: else
0009: {
0010: self.pauseResumeButton.title = NSLocalizedString(@"Resume", nil);
0011: [self.pauseResumeButton setAction:@selector(resumeSpeaking:)];
0012: }
0013:}
Here we've passed YES into the method for the paused parameter, so let's break down the `if` block. First, we'll set the title of the pause/resume button to "Pause". Then we'll set the selector so it calls `-pauseSpeaking:` when the button is tapped. So let's assume the user has tapped the button and look at what happens next.
0001:- (IBAction) pauseSpeaking:(id)sender
0002:{
0003: [self.synthesizer pauseSpeakingAtBoundary:AVSpeechBoundaryImmediate];
0004:}
And we're finally back to the synthesizer. We send a message to the synthesizer asking it to pause speaking immediately. You may remember from before that we can ask it to pause speaking after the current word by passing in AVSpeechBoundaryWord instead.
And that's that - now you can go build apps that talk to your users with AVFoundation's simple, easy-to-use API.
Summary
In this chapter, we looked at why you should make your apps accessible (in case you forgot - it's easy, it's right, and it's good for everyone). We also explored Dynamic Type and how your apps can respond to the user's preferred text size. And we wrapped it all up with Apple's new Text to Speech API and showed how you can implement Text to Speech in your apps.