Developing an iOS 7 Edge
2. Dynamic Animations with a Physical Feel

IN THIS CHAPTER
- What you can do with the new UI dynamics
- The animator and dynamic behaviors
- Getting physical with gravity and collisions
- Feeling attached (what a drag)
- Adding springiness and changing properties
- Predefined behaviors (oh, snap!)
- Going further
The new UIKit Dynamics introduced in iOS7 gives you the ability to incorporate simulated physical "behaviors" in your user interface. Your first experience with UIKit Dynamics will likely be with the new lock screen. After you lock your phone, notice that if you pull up on the camera icon a short distance, the screen will "fall" back down gently. If you pull up far, the screen accelerates down with simulated gravity and bounces. Since the physical behaviors of gravity and collisions are being simulated there is a lot more subtlety in the interaction than a pre-defined animation - you actually get some of the feeling of weight. The result is that your application feels more alive.
UIKit Dynamics are not designed to replace Core Animation or the other animation techniques - they are best used when you specifically want to add simulated physics to your user interface. The underlying physics engine only handles simple interactions in 2-dimensions. It's great for UI animations but if you're looking for a physics engine for a game you'd be better served elsewhere.
Key concepts: animator, behaviors and items
A dynamic animator provides access to the underlying iOS physics engine and animates a set of items based on attached behaviors. Some examples of pre-defined behaviors are gravity, collisions, and attachment. To start the animation you create the animator and some items and then attach behaviors to the items and add the behaviors to the animator. The animator then takes over and simulates the system using the items and behaviors.
For example, you can create an animator, attach gravity and collision behavior to a set of views and then add the gravity and collision behaviors to the animator. The animator will then start to simulate the system and the views can fall and bang into each other.
The relevant classes and protocols:
UIDynamicAnimator- provides overall control for the physics simulationUIDynamicItem- protocol for objects to participate in the animationUIDynamicBehavior- pre-defined behaviors like springs and collisions, or create your own
Getting physical with gravity and collisions
We'll start by having one of our views drop to the bottom of the screen. As any earthling knows, when you let go of an object, it doesn't simply fall down at a constant speed - it accelerates under the influence of gravity. What intrigued Sir Isaac Newton under the apple tree will now become part of our app experience. Let's drop part of our BepBop user interface and have it accelerate under simulated gravity!
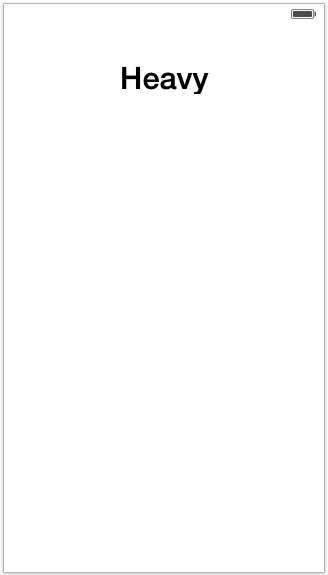
Here's our user interface before we add any dynamics. We want to make the "Heavy" label fall to the bottom of the screen. The full code sample is at https://github.com/iosedgeapp/iOSEdge/blob/master/BepBop/BepBop/BEPDynamicsHeavyViewController.m
The first step in creating our animation is to create a UIDynamicAnimator object that provides the overall context for the animation. In this example we initialize the animator with a view that will provide the reference coordinate system for the animation. We store a reference to the animator so we can access it later.
0001:    // Create a basic animator using our view as the reference view
0002:    UIDynamicAnimator *animator = [[UIDynamicAnimator alloc] initWithReferenceView:self.view];
0003:    self.animator = animator;
Without any behaviors to simulate, the animator will just sit there. The animator is smart enough to know when the system is at rest and won't consume any CPU when there is nothing to animate.
Let's create a basic gravity behavior that will pull the "Heavy" label to the bottom of the screen. When we create the behavior we tell it what items to affect - in this case the heavy label.
0001:    // Create a basic gravity behavior and have it affect the heavy label
0002:    UIGravityBehavior *basicGravity = [[UIGravityBehavior alloc] initWithItems:@[self.heavyLabel]];
0003:    [self.animator addBehavior:basicGravity];
0004:    self.gravity = basicGravity;
Adding the behavior to the animator is enough to start the animation. The heavy label will start to drop, right off the edge of the screen! We've defined gravity to pull the label down, but nothing to make it stop at the bottom of the screen. To do that we can give it something to collide with.
Let's set up a collision behavior that will make the bounds of the reference view a collision boundary. Since this is a common task there is a built-in property on the UICollisionBehavior object to enable it. When the label hits the collision boundary it won't simply stop - it will bounce as if it has some momentum.
0001:   // Without any collision behavior, the heavy label would fall right off the screen.
0002:    // Try commenting out this section and see what happens.
0003:    UICollisionBehavior *collideWithBounds = [[UICollisionBehavior alloc] initWithItems:@[self.heavyLabel]];
0004:    collideWithBounds.translatesReferenceBoundsIntoBoundary = YES; // Simple way to make bounds of reference view into a collision boundary
0005:    [self.animator addBehavior:collideWithBounds];
How does UIKit determine how quickly the "Heavy" label should fall? Under real-world gravity, an apple will fall from a tree at 9.8 meters / second2. UIKit has its own constants that provide animations that feel and look good by default. UIKit gravity is defined as 1000 points / second2. What's important is not so much the actual value but knowing that you can adjust the properties to get the feel that you want. In this case UIGravityBehavior has a magnitude property that you can adjust to make gravity more or less strong.
Changing behavior properties is an important technique for adjusting the feel of your interaction in subtle or not so subtle ways. When you change a behavior property the animator will start to animate using the new value. Let's try changing the direction of gravity and see what happens.
0001:- (IBAction)handleTapGesture:(UIGestureRecognizer*)gesture
0002:{
0003:    if (self.gravity.gravityDirection.dy > 0) {
0004:        // If gravity is pulling down, make it pull up!
0005:        self.gravity.gravityDirection = CGVectorMake(0, -1);
0006:        self.directionLabel.text = @"↑";
0007:    } else {
0008:        // Switch to normal gravity
0009:        self.gravity.gravityDirection = CGVectorMake(0, 1);
0010:        self.directionLabel.text = @"↓";
0011:    }
0012:}
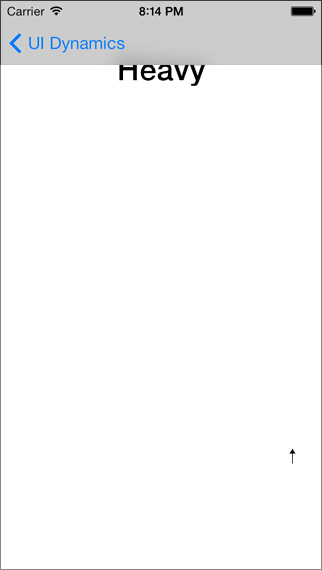
When you tap the screen the gravityDirection property will switch between "up" and "down". If you tap the screen when the label is at the bottom it will be pulled up to the top and an arrow will be shown with the current gravity direction. The animator picks up the change in the gravityDirection property and keeps animating seamlessly.
With gravity reversed, the "Heavy" label accelerates to the top of the screen. Try tapping the screen repeatedly and see how the animator has no problem changing the "rules" of physics on the fly.
Feeling attached (what a drag)
It's common to have the user drag a user interface element around on screen. Let's make things more interesting by adding some physical behavior to a drag interaction.
In the storyboard for this example we set up an orange "brick" that we can drag around the screen. Instead of dragging the brick directly we'll pull and push on it as if there were a solid stick between the user's finger and the point marked in blue. To achieve this we'll create a UIAttachmentBehavior between the orange view and an anchor point shown in red. Attachments simulate physical connections between items, or between an item and an anchor point. In this case we'll create an attachment between the orange brick and an anchor point that we'll update with the position of the user's touch. The physics engine will take care of simulating the forces to make the movement and feel similar to pulling a long trailer behind a car.

The code for this example is available at https://github.com/iosedgeapp/iOSEdge/blob/master/BepBop/BepBop/BEPDynamicsAttachmentViewController.m
First things first, we create an animator. Not very interesting here.
0001:    // Set up animator
0002:    UIDynamicAnimator *animator = [[UIDynamicAnimator alloc] initWithReferenceView:self.view];
0003:    self.animator = animator;
By default attachments are made between the centers of items. To make things more interesting we want to offset the attachment point. So we need to find the offset of the blue point and the center of the orange view. We calculate and save the offset. For details of calculating the offset, see the full code on github.
0001:    // By default items are attached at the center. To make things more
0002:    // interesting we offset the drag point to match the position of the blue
0003:    // view. Try changing the position of the blue view in the storyboard to
0004:    // move the attachment point.
0005:    self.attachmentOffset = [self offsetFromCenter:self.attachmentView.center inView:self.orangeView];
Let's set up a UIAttachmentBehavior between the orange brick (offset from the center) and an anchor point. We'll update the anchor point of this attachment behavior to track the user's finger on the screen. We'll also update the red view to show the position of the anchor point.
0001:    // Set up the attachment behavior. The attachment is made between the orange view (offset
0002:    // from the center) to the center of the red view. The attachment anchor point
0003:    // will by updated by our code to follow the finger on the screen.
0004:    CGPoint initialAnchorPoint = self.touchView.center;
0005:    UIAttachmentBehavior *attachmentBehavior = [[UIAttachmentBehavior alloc] initWithItem:self.orangeView offsetFromCenter:self.attachmentOffset attachedToAnchor:initialAnchorPoint];
0006:    [self.animator addBehavior:attachmentBehavior];
0007:    self.attachmentBehavior = attachmentBehavior;
When the user drags their finger, we need to find the position of the touch point in the reference view that we're using for the dynamics simulation. The animator makes the reference view available in the referenceView property, and we can ask the gesture recognizer to give us the touch location inside that view.
0001:- (IBAction)handlePanGesture:(UIPanGestureRecognizer*)gesture
0002:{
0003:    // Get location of touch relative to reference view
0004:    CGPoint touchPoint = [gesture locationInView:self.animator.referenceView];
Now that we know the location of the touch point we can update the attachment anchor point to match it. As we move the anchor point, the orange block will get dragged (or pushed) via the attachment.
0001:    // Update the anchor point
0002:    [self.attachmentBehavior setAnchorPoint:touchPoint];
The orange block will now get dragged as we move our finger on the screen. But what happens if we remove our finger and then touch again somewhere different? We've set this attachment up as a "hard" attachment (the default behavior) and it will try to preserve the length between the attachment point on the orange view and the anchor point. If we lift our finger off the screen and touch down far away, the anchor point will "jump" to the new location and the orange block will jump with it.
The solution is to update the length of the attachment when the user starts a new drag gesture, to match the new distance between the touch/anchor point and the attachment point. This makes for a more natural user interaction - the attachment "magically" updates to match the new geometry between your finger and the brick when you put your finger on the screen.
0001:    // If starting a drag, update the length of the attachment, for a more
0002:    // natural interaction - like dragging a stick starting from the touch point
0003:    if (UIGestureRecognizerStateBegan == gesture.state) {
0004:        self.attachmentBehavior.length = [self distanceBetweenTouchAndAttachmentPoint:touchPoint];
0005:    }
Adding springiness and changing properties
Next we'll see how to add springiness and change some of the dynamic item properties to make items seem lighter or constrain their rotation (you might want your login dialog to bounce but not spin out of control).
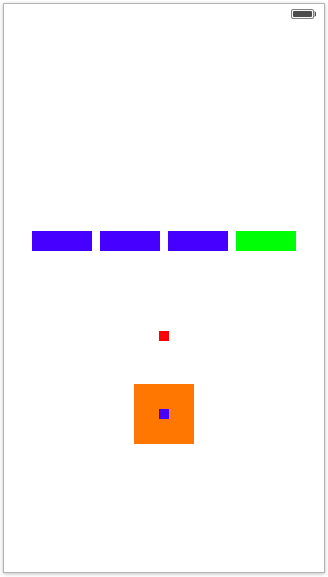
In this example we'll set up a "snake" of connected boxes, where the green "tail" is lighter and easier to spin. We'll be able to drag the orange block as if connected to a spring, and the block will always stay upright. The code for this example is at https://github.com/iosedgeapp/iOSEdge/blob/master/BepBop/BepBop/BEPDynamicsSpringViewController.m
Here's the storyboard for this example. We'll attach dynamics to different colored "bricks", the red touch point and the blue attachment point.
Let's set up an attachment behavior between the red touch point and blue attachment point. This is similar to the last example, but this time we'll change the attachment properties to make the attachment springy.
We'll make a new attachment behavior each time a drag is started and remove it from the animator when the drag ends. The dynamics animator is designed so that you can add and remove behaviors on the fly as the simulation is running. Setting the damping and frequency properties of the attachment is enough to make it springy instead of solid.
0001:    // When starting a drag, we create a new attachment behavior for dragging
0002:    // the orange block and add it to the animator.
0003:    if (gesture.state == UIGestureRecognizerStateBegan) {
0004:        // Set up the attachment behavior that we'll use to drag the orange block
0005:        UIAttachmentBehavior *touchAttachmentBehavior = [[UIAttachmentBehavior alloc] initWithItem:self.orangeView offsetFromCenter:self.attachmentOffset attachedToAnchor:touchPoint];
0006:
0007:        // Make the attachment springy
0008:        touchAttachmentBehavior.damping = 0.4;
0009:        touchAttachmentBehavior.frequency = 1.5;
0010:
0011:        // Add the attachment behavior
0012:        [self.animator addBehavior:touchAttachmentBehavior];
0013:        self.attachmentBehavior = touchAttachmentBehavior;
When the drag ends, we remove the attachment behavior from the animator. Once the attachment is gone, the orange block can keep moving. Try "flicking" the orange block by accelerating it and pulling your finger off the screen.
0001:    } else if (gesture.state == UIGestureRecognizerStateEnded) {
0002:        // The pan ended, so remove the behavior. Let that orange block run free!
0003:        [self.animator removeBehavior:self.attachmentBehavior];
0004:        self.attachmentBehavior = nil;
If you tried dragging the orange block at this point, you'd see that it spins around the blue attachment point, sometimes fast! To avoid getting motion sickness, let's disallow rotation for the orange block so we can visually concentrate on it's x-y motion instead of being hypnotized by a spinning brick. To do this we create a UIDynamicItemBehavior so that we can tell the animator that the item for the orange brick shouldn't be allowed to rotate.
0001:    // Don't let the orange block spin
0002:    UIDynamicItemBehavior *disableRotationBehavior = [[UIDynamicItemBehavior alloc] initWithItems:@[self.orangeView]];
0003:    disableRotationBehavior.allowsRotation = NO;
0004:    [self.animator addBehavior:disableRotationBehavior];
Next, we connect the blue and green views together. We make attachments between the bricks to connect them in a line.
0001:- (void)connectSnakeViews
0002:{
0003:    // We offset the connection points to make it more like a "snake"
0004:    UIOffset offsetLeft = UIOffsetMake(-25, 0);
0005:    UIOffset offsetRight = UIOffsetMake(25, 0);
0006:
0007:    // Connect blue 1 to 2 and add to animator
0008:    [self.animator addBehavior:[[UIAttachmentBehavior alloc] initWithItem:self.blueView1 offsetFromCenter:offsetRight attachedToItem:self.blueView2 offsetFromCenter:offsetLeft]];
0009:
0010:    // Attach blue 2 to 3 and add to animator
0011:    [self.animator addBehavior:[[UIAttachmentBehavior alloc] initWithItem:self.blueView2 offsetFromCenter:offsetRight attachedToItem:self.blueView3 offsetFromCenter:offsetLeft]];
0012:
0013:    // Attach the tail
0014:    [self.animator addBehavior:[[UIAttachmentBehavior alloc] initWithItem:self.blueView3 offsetFromCenter:offsetRight attachedToItem:self.greenView offsetFromCenter:offsetLeft]];
0015:}
To make things more interesting, let's make the green "tail" of the snake lighter and easier to spin. To do this we create a UIDynamicItemBehavior that modifies the simulated properties of the green brick.
0001:    // Make the "tail" of the snake light and easier to spin
0002:    UIDynamicItemBehavior *lightBehavior = [[UIDynamicItemBehavior alloc] initWithItems:@[self.greenView]];
0003:    lightBehavior.density = 0.1;
0004:    lightBehavior.angularResistance = 0.1;
0005:    lightBehavior.resistance = 0.1;
0006:    [self.animator addBehavior:lightBehavior];
0007:
Now let's make all the bricks collide with each other as well as a boundary at the bounds of our reference view (so the bricks don't fly off the screen).
0001:    // Make blocks collide with each other
0002:    NSArray *coloredBlocks = @[self.orangeView, self.blueView1, self.blueView2, self.blueView3, self.greenView];
0003:    UICollisionBehavior *collisionBehavior = [[UICollisionBehavior alloc] initWithItems:coloredBlocks];
0004:
0005:    // Set up a collision boundary along the bounds of the reference view.
0006:    // Collisions with this boundary will have a nil identifier.
0007:    collisionBehavior.translatesReferenceBoundsIntoBoundary = YES;
It's possible to get notified of collisions by setting a delegate on the collision behavior. Let's make the bricks slightly transparent when they collide with the collision boundary that we just set up.
First we need to declare that we implement the UICollisionBehaviorDelegate so we'll be sent collision events.
@interface BEPDynamicsSpringViewController : UIViewController <UICollisionBehaviorDelegate>
Next we set ourselves as the delegate for the collision behavior.
0001:    // Set ourselves as delegate so that we receive collision events
0002:    collisionBehavior.collisionDelegate = self;
Now the collision behavior will call us when collisions begin and end. It's possible to add multiple collision boundaries to a collision behavior. For example, you could add a collision boundary approximating a "wall" between two points. In that case you set an explicit boundary identifier so that you know which boundary was hit. There are also delegate methods to get notified of contacts between items.
Here's the code that's called by the collision behavior when a collision occurs. We make the view lighter (by reducing the alpha) when a collision contact begins and change it back to normal when the contact ends. Try trapping a brick against the collision boundary and see that it gets lighter.
0001:#pragma mark CollisionBehaviorDelegate methods
0002:
0003:- (void)collisionBehavior:(UICollisionBehavior *)behavior beganContactForItem:(id)item withBoundaryIdentifier:(id)identifier atPoint:(CGPoint)p
0004:{
0005:    if (identifier == nil) {
0006:        // Collided with default boundary, make view lighter
0007:        if ([item isKindOfClass:[UIView class]]) {
0008:            UIView *collidedView = (UIView*)item;
0009:            collidedView.alpha = 0.5;
0010:        }
0011:    }
0012:}
0013:
0014:- (void)collisionBehavior:(UICollisionBehavior *)behavior endedContactForItem:(id)item withBoundaryIdentifier:(id)identifier
0015:{
0016:    // Collision contact ended, make view opaque again
0017:    if ([item isKindOfClass:[UIView class]]) {
0018:        UIView *collidedView = (UIView*)item;
0019:        collidedView.alpha = 1.0;
0020:    }
0021:}
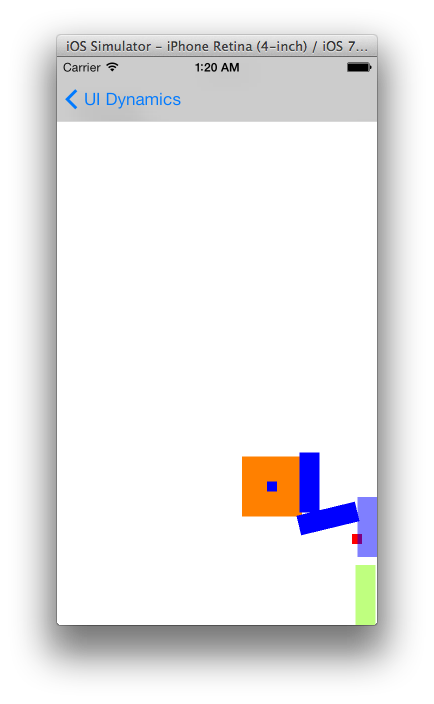
Run the example and try dragging around the orange brick. You'll see that it's attached to your finger via a spring and doesn't rotate. The blue and green bricks are attached together, and the green brick spins more easily. The bricks turn a lighter shade when they collide with the boundary that we set up.
Here's our example in action, in a configuration of bricks that I never could have deliberately programmed. The orange brick is pushing the other bricks against the edge of the screen. The blue and green bricks at the edge of the screen are lighter, since we turn the bricks lighter while they are in contact with the collision boundary at the edge of the screen.
There's a lot going on in this example, but we built it up step by step by declaring the individual behaviors that we wanted. When creating your own dynamics, you'll want to build up the animation incrementally - if you start with too much complexity it will be difficult to get the animation to feel right.
Predefined behaviors (oh, snap!)
Now that we created a complex animation of our own, let's take a little breather and use one of the predefined behaviors that makes items snap to a predefined position. In this example we'll use UISnapBehavior to move some text to where the user taps their finger. The dynamic behavior will give the movement a playful feel.
Here's the storyboard for this example. The full code is available at https://github.com/iosedgeapp/iOSEdge/blob/master/BepBop/BepBop/BEPDynamicsSnapViewController.m
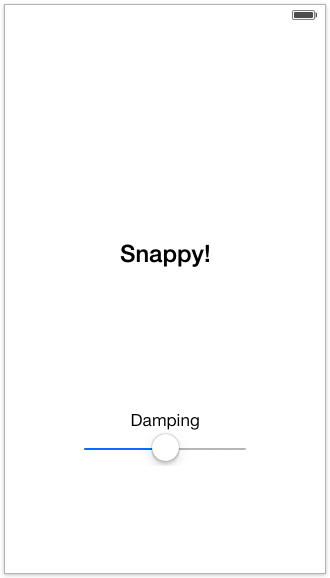
The "Snappy!" text will snap to where the user taps the screen. You can think of the snap behavior as being composed of four springs pulling out from each corner of the dynamic item (the "Snappy!" label in this case). We'll control the damping of the snap behavior using the "Damping" slider.
To make the label snap to the touch point, we'll follow these steps:
- Set up the animator with a reference view that provides the coordinate system.
- Convert the touch point into coordinates in the reference view, so we can use it inside the dynamics simulation.
- Create a
UISnapBehaviorthat includes the "Snappy!" label as a dynamic item and the touch point as the "snap to" point. - Adjust the damping of the snap behavior (more or less springy).
- Remove the previously active snap behavior (from the previous touch), if there is one.
- Add the new snap behavior to the animator.
Since we've gone through the steps before, here's the code all at once. The description is almost as long as the code!
- (void) viewDidLoad0001:{
0002:    [super viewDidLoad];
0003:    // Do any additional setup after loading the view.
0004:
0005:    // Set up the animator using our view as the reference view / coordinate system
0006:    UIDynamicAnimator* animator = [[UIDynamicAnimator alloc] initWithReferenceView:self.view];
0007:    self.animator = animator;
0008:}
0009:
0010:- (IBAction) handleTapGesture:(UITapGestureRecognizer*)tapGesture
0011:{
0012:    CGPoint point = [tapGesture locationInView:self.animator.referenceView];
0013:
0014:    // Create a new snap behavior
0015:    UISnapBehavior* snapBehavior = [[UISnapBehavior alloc] initWithItem:self.snappyView snapToPoint:point];
0016:
0017:    // The damping controls how springy the snap animation is. You
0018:    // can play with different damping values by changing the slider.
0019:    snapBehavior.damping = self.dampingSlider.value;
0020:
0021:    // If there was a previous snap behavior, remove it
0022:    if (self.snapBehavior)
0023:    {
0024:        [self.animator removeBehavior:self.snapBehavior];
0025:    }
0026:
0027:    // Add the new behavior
0028:    [self.animator addBehavior:snapBehavior];
0029:    self.snapBehavior = snapBehavior;
0030:}
Try touching different places on the screen and watch the label snap into place. Now try adjusting the damping for an effect ranging from mild to wild.
In this section we showed a simple example pulling together all of the steps needed to build a simple dynamics animation with customization of the animation properties. In a very small amount of code you can create dynamic animations that have a physical feel and react with subtle (or not so subtle) depth to your user's interaction.
Going further
In addition to the dynamic behaviors we've covered so far the UIPushBehavior allows you to create forces directly on your dynamic items. You can also create your own behaviors by subclassing UIDynamicBehavior or adding child behaviors for more advanced effects.
We've used views such as labels and simple "bricks" as our dynamic items. A UIDynamicAnimator can also animate a collection view layout. For example you could have new items added to a collection view bump into existing items complete with collisions, springs and gravity. In fact, all you need, to have an object be animated, is for it to conform to the UIDynamicItem protocol (which provides access to 2D position, size and rotation).
Summary
In this chapter we saw how to add "physical" behaviors to your user interface like springiness, weight and collisions. You add individual behaviors like gravity and attachment to a dynamic animator and specify what items should interact. By combining multiple simple behaviors you can get a sophisticated interaction that has a physical feel. We saw examples of using the predefined behaviors in response to user interaction and gave pointers for further exploration. In the next chapter we'll look at some of the powerful new techniques available for creating custom transitions between views.