AngularJS Book
Chapter 6. Directives in Detail
Directives live in the view. Directives are likely the hardest part of AngularJS to grasp, but also likely the most powerful. If you can understand how to write a directive, you can save yourself writing a lot of markup. Directives essentially extend HTML and you can use them to create your own DSL (domain-specific language).
Directives are not injectable. There is no sane way to access the behavior of a directive, and if you feel you need to, you're doing it wrong. They are meant to be put in the view and the view only. Unlike filters, which mainly live in the view, there is no handy $directive service to grab one. If you want one, you'll have to put it in some markup and compile and/or link your markup (which you can do programmatically via the $compile service, but let's not worry about that yet).
Adding Our Directive
We will start with a relatively trivial and useless directive, then provide more examples of different directive types, and some special directives that you'd use if you wanted certain behaviors; specifically custom form validation.
Our blog has a custom directive called boldClick, which toggles a bold font weight to the HTML element the directive is used on, upon click. Here is an example of handling this with a directive:
blog.directive('boldClick', function() {
  return function(scope, element) {
     var bold = false;
     element.click(function() {
       if (bold) {
         element.css('font-weight', 'normal');
       } else {
         element.css('font-weight', 'bold');
       }
       bold = !bold;
     });
  };
});
And in the view, it looks like this:
My pet is a <span bold-click>tortoise</span>.
Let's approach this line by line.
- First off, we name our directive
boldClick. This is the common name for the directive, but when using it in a view we have many different options, as discussed earlier (using any of them, such as bold-click, will automatically be camelCased). A directive is a function that returns an object (and in some simple cases, just a function). - In our object, we have two keys: restrict and link. restrict tells AngularJS how the directive can be used. This value can be nothing, E (element), A (attribute), C (class) or M (comment). If omitted, it defaults to A, which means you can remove it from your directive definition. If specified, AngularJS will throw an error if you try to use your directive in an unintended way.
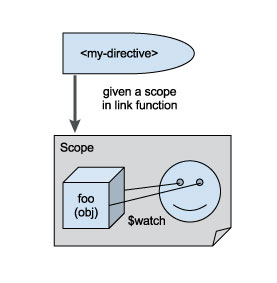
- link defines a linking function. Nine times out of ten, your directive will have a link, as it is the most common situation. A linking function is passed a Scope object (likely from whatever scope it's within inside your view; think the closest parent controller's scope), an element (the directive's element itself; this is a jqLite or jQuery object), and an attribute object representing all of the attributes of the element. Optionally it is passed a controller instance.
 jqLite?
jqLite is what you get to work with when you haven't included jQuery. If you have included jQuery, don't worry about jqLite, as Angular will use that instead. It is a library that is a subset of the jQuery library, so it has limited functionality. What it can do is discussed in the documentation for angular.element: http://docs.angularjs.org/api/angular.element. Importantly, jqLite does not use jQuery selectors. If you need selectors, you will need jQuery proper.
The linking function gets executed by AngularJS during HTML compilation when scopes become available. This is in contrast to the compile function, which is executed before scopes become available, which we will touch on later. This linking function is where we want to put our directive's logic.
This particular directive simply binds a click event to the element, and changes the appearance of that element with the css() function. Clicking the post body will change the text from normal weight to bold, and vice-versa.
That's a simple attribute-based directive. Let's write trivial examples of the other three types of directives. I'd like a directive that I can stick in an HTML comment that will insert a copyright for anyone who happens to be browsing the code:
Comment-Type Directive
The following is an example of a comment-type directive:
blog.directive('copyright', function () {
    return {
        restrict: 'M',
        compile: function (element) {
            element.text('Copyright 2013 Rhoda Bote');
       }
    };
});
And the usage of a comment-type directive:
<!-- directive: copyright -->
Here is the output (what you get when you inspect the markup):
<!-- Copyright 2013 Rhoda Bote -->
I've found that creating comment directives is a little different than dealing with elements. Typically when replacing elements with a template or other elements, you would use the replace and/or transclude options of the copyright object. However, those require HTMLElement objects to function properly, not Comment objects. So if we want to do something incredibly simple like replace some text with other text, we can use the text() method.
Note that this directive uses compile instead of link. The only reason I made this decision was because we did not need a scope. A scope would have variables and functions and who-knows-what in it, and all we needed was some static text. To sum up: Need a scope? Link. Don't? Compile.
Element-Type Directive
Here's an example of using an element directive:
// This directive replaces <new-post-area> with the template below
// it links the post, cancel and save attribs to the parent scope,
// but it copies cancelText and saveText verbatim.
blog.directive('newPostArea', function() {
    return {
        restrict: 'E',
        scope: {
            post: '=',
            cancel: '=',
            save: '=',
            cancelText: '@',
            saveText: '@'
        },
        replace: true,
        template: '<div ng-show="post">' +
            '<input type="text" ng-model="post.temp.title"/><br/>' +
            '<textarea ng-model="post.temp.body"></textarea><br/>' +
            '<button ng-click="cancel(post)">{{cancelText}}</button>' +
            '<button ng-click="save(post)">{{saveText}}</button></div>'
     };
});
Usage:
<new-post-area post="new_post" cancel-text="Cancel" cancel="cancel" save-text="Save" save="save"></new-post-area>
Output as reported by Chrome, anyway:
<div ng-show="post" post="new_post" cancel="cancel" save="save" style="">
    <input type="text" ng-model="post.temp.title" class="ng-valid ng-dirty"><br>
    <textarea ng-model="post.temp.body" class="ng-valid ng-dirty"></textarea><br>
    <button ng-click="cancel(post)">Cancel</button><button ng-click="save(post)">Save</button>
</div>
The resulting HTML works by binding scope properties. We have a property in our scope, new_post, where we store new post information. We give the directive that, and bind it to the directive's scope using the scope key. Normally directives do not create their own scope, but this one does. In fact, it creates something called an isolate scope which does not prototypically inherit from its parent. We declare explicitly what ends up in the scope via the definition object. The scope definition object (the "scope: .." bit) is completely opaque and requires discussion. Later.
Class-Type Directive
Finally, we have a class-type directive. Basically this means you can use a class attribute on any HTML tag, and AngularJS will process it accordingly. This may be handy if you have CSS styles associated with the directive name, or want to use the directive name in a jQuery selector, for some reason.
// This directive is like the "!important" CSS value on steroids.
// it will automatically use JavaScript to override whatever CSS a node may have on it.
// I think this is probably a terrible idea.
blog.directive('importantBackgroundColor', function() {
    return {
        restrict: 'C',
        priority: -99999, // we want this to be run dead last
        // we don't use compile because we want to do this at the last possible minute
        link: function(scope, element, attribs) {
            element.css('background-color', attribs.color);
        }
    };
});
Usage:
<div class="important-background-color" color="#EEE">fleas</div>
This outputs nothing different, but if you inspect the element it will have a style attribute equal to background-color: #EEE or something similar. This will override any CSS style you may have written, or any !important CSS style you may have written, which makes this very important indeed. The priority key here is used to tell the directive to compile and link absolutely last (or close to it) compared to other directives that may be on the same node. If there was a competing directive that did the same thing as this with an even lower priority, it would override the resulting background color. Of course, something like this is only useful if you have a lot of legacy CSS sitting around, preventing you from getting it quite right. You can use this directive and add to the madness.
These were examples of restricting directives to certain usages. Next, let's cover some more directive concepts.
The Widget
I don't think there's any formal definition for what a widget is, but often I've heard it used to reference a UI element, particularly one that a user can interact with in some way. Maybe this is a date picker or a rich text editor. But these can also be very simple, like this dead-simple example of an accordion:
blog.directive('accordion', function() {
    return {
        restrict: 'E',
        replace: true,
        template: '<div class="accordion"><h3>{{title}}</h3>' +
            '<div class="accordion-content" ng-show="open" ng-transclude></div>',
        transclude: true,
        scope: {
            title: '='
        },
        link: function(scope, elm) {
            scope.open = false;
            // assume we have no jQuery.
            angular.element(elm.children()[0]).bind('click', function() {
                scope.$apply('open = !open');
            });
        }
    };
});
OK, maybe not dead simple, but it's definitely maimed. Let's go at it one piece at a time.
- restrict: We've already covered the E restriction, which tells AngularJS the directive is to be used as an element; <accordion>...</accordion>.
- replace: We want the directive to replace the <accordion>...</accordion> markup in our HTML with the template, which is specified by...
- template: Nothing new here except the use of the
ngTranscludedirective. If you have this somewhere in your template, and specify... - transclude: ...to be true, then the contents of the original HTML will be placed inside the node that has the ngTransclude directive on it. So we can use this directive like so:
<accordion>beans</accordion>and "beans" will appear within the <div> with the class accordion-content. ThengTranscludedirective basically just says "put the directive's original content here." - scope: This loathsome object tells us to create an isolate scope, and within that scope create a model called "title", and the value of this model will be the value of the attribute "title" in the directive. So:
<accordion title="'pinto'">beans</accordion>will give the directive a title to work with. Note that the value of the title attribute here is a string, but it could be the value of whatever AngularJS expression you wish.
The keys of this object are the names of members of the new isolate scope, and the values are describing how to get these values. A '=' will link directly to a model in the parent scope with the same name. '=foo' will link to a model in the parent scope of the name 'foo'. A '@' will treat your attribute with the same name as a string, basically. '@foo' will look for an attribute called foo and assign it to whatever the key is. '&' allows you to bind an expression and execute it against the parent scope with a function. Given {localFn: '&'}, the directive will look for a 'local-fn' attribute and put its value (say, "foo + 2") into a function. When you are ready, execute localFn(), and the result will be evaluated against the parent scope and returned. If the expression contains a function with arguments, you can pass arguments as a name/value mapping into the localFn: if the expression is "foo(bar)", you may say localFn({bar: 'baz'}) and 'baz' will be passed in as 'bar' to the 'foo' function in the expression.
* link: What do we get in elm? We get the root element of our template, which is the <div> with the accordion class. First, we set open to be false to control the visibility of the accordion's content. Then we grab the <h3> node (remember, no selectors in jqLite) and bind a click event to it, which simply flips the boolean value of the open model--which, in turn, hides and shows the content.
The markup for this looks like:
.Usage of our accordion directive
[source,html]
----
<accordion title="'I like...'">pinto beans!</accordion>
----
Easy and neat. Output looks something like:
<div class="accordion">
    <h3>I like...</h3>
    <div class="accordion-content" ng-show="open" ng-transclude>pinto beans!</div>
</div>
The <h3> node, when clicked, will hide and show the its sibling <div>. You could also implement a dropdown-type menu this way using some CSS and HTML lists.
Conversing with jQuery
You may have some jQuery plugin hanging around somewhere you want to use with AngularJS, or maybe a simple jQuery function not available to jqLite. animate() is a good example of this. Keep in mind you can achieve the same thing with AngularJS animations, but here goes:
<p id="foo" style="display: none;">
    This fades in
</p>
And the jQuery to set it up:
$(function() {
     $('#foo').fadeIn('slow');
});
To use fadeIn, do this:
<p fade-in="true">
    This fades in
</p>
And of course:
blog.directive('fadeIn', function () {
    return function (scope, element, attribs) {
        element.css('opacity', 0); // css available in jqLite
        scope.$watch(attribs.fadeIn, function (val) {
            if (val) {
                $(element).animate({'opacity': 1.0}, 1000); // must use jQuery proper to use animate()
            } else {
                $(element).animate({'opacity': 0}, 1000);
            }
        });
    };
});
Note that we're not fully taking advantage of this directive's watch on a model; we just pass in true to immediately animate upon load. If we wanted to, we could specify a boolean model, and whenever that model changed, the node would fade in and out.
While this implementation is a few more lines of code, if you do this all over the place you'll eventually save yourself many lines of code. Generally you can expect that if you write a reusable directive, even though the up-front cost is higher, you'll eventually save yourself a lot of JavaScript.
Custom Validation
I needed to validate a "time" field. This time must be some date/time in the future, but not too far in the future. Since there's no time picker widget (we could write one, I guess) let's just use a text input field and run custom validation against it. The user will have to type in a parseable date/time. Our markup will look like this:
<form name="timeForm">
    <input name="time" type="text" futureTime placeholder="enter a time" ng-model="time"/>
</form>
Note that to use AngularJS' validation mechanism, you must use a form. You can nest forms if necessary (using ngForm), but we won't be doing that here. This is the futureTime directive:
// futureTime directive sets validity of text input box if the user types in a parsable time that
// is in the future
blog.directive('futureTime', function() {
    return {
        require: '?ngModel',
        link: function(scope, elm, attrs, ngModel) {

            // no 'get()' in jqLite; use elm as array to get at the DOM node object
            if (!ngModel || attrs.type !== 'text' || elm[0].tagName.toLowerCase() !== 'input') {
                 return; // do nothing if no ngModel specified OR the input field is not of type "text"
            }

            // we want this to be the first check we do, in case there are others.
            // whatever we return from this function ends up as the view value, so if you
            // want to clear invalid input,
            // simply return nothing.
            ngModel.$parsers.unshift(function(view_value) {
                var ts, nows;
                // first case: empty field. this is OK
                if (!view_value) {
                    ngModel.$setValidity('futureTime', true);
                    return;
                }

                // second case: unparsable date
                ts = Date.parse(view_value);
                if (isNaN(ts) || ts < 0) {
                    ngModel.$setValidity('futureTime', false);
                    return view_value;
                }

                // third case: valid date, but in the past or present
                nows = new Date().getTime();
                if (ts <= nows) {
                    ngModel.$setValidity('futureTime', false);
                    return view_value;
                }

                // fourth case: future date!
                ngModel.$setValidity('futureTime', true);
                return view_value;
            });
        }
    };
});
Since we have a form, we can use AngularJS' built-in validation. Let's change our HTML partial to this:
<form name="timeForm">
    <input name="time" type="text" future-time placeholder="enter a time" ng-model="time"/>
    <div style="color: red" ng-show="timeForm.time.$error.futureTime">This is not a valid future time.</div>
</form>
When we name a <form>, it triggers AngularJS' built-in form directive. This will put a model into the scope representing the form with the same name as that form. So since we named our form "timeForm", it is available on the scope. Also, any named form fields within that form are available as objects within the form model. Since we have an <input> named "time", we can refer to it as timedForm.time. Note that this does NOT represent the actual value of the form element; that is reserved for ngModel.
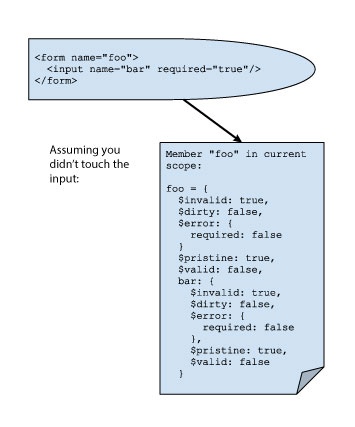
When doing validation in this manner, AngularJS sets some special values within the input field model, one of which is $error. When we do ngModel.$setValidity('something', false);, we are telling AngularJS that the model has an error in it, and the error has the validation error key of "something". The value will be boolean true if there is a problem and false if not. As a bonus, AngularJS will put a class on the form element. If you have a validation error key in the form someCamelCase, it will slap the ng-valid-some-camel-case or the ng-invalid-some-camel-case class on the element, depending. That way you can highlight a bad field in red quite easily if you wish.
This is just one example of how to do custom validation. With the classes and data-bound booleans, it accommodates many configurations of error reporting. We'll do another "cookbook" style example of form validation later.
Here are some tests for our futureTime directive:
describe('Blog Directives', function () {
    var $compile, scope;

    // this is a convenient function to use when unit testing directives;
    // you will find yourself doing this often
    function compileAndApply(template) {
        var compiled = $compile(template)(scope);
        scope.$apply();
        return compiled;
    }

    beforeEach(inject(function ($injector, $rootScope) {
        $compile = $injector.get('$compile');
        scope = $rootScope.$new();
    }));

    describe('the linking function', function () {
       it('should not throw error if no ngModel supplied', function () {
           var template = '<form name="timeForm">' +
               '<input name="time" type="text" future-time/>' +
               '</form>';
           expect(function () {
               compileAndApply(template);
           }).not.toThrow();
       });

       it('should be valid on undefined value', function () {
           var template = '<form name="timeForm">' +
               '<input ng-model="time" name="time" type="text" future-time/>' +
               '</form>';
           compileAndApply(template);
           expect(scope.time).toBeUndefined();
           expect(scope.timeForm.$valid).toBeTruthy();
       });

       it('should be invalid on non-parseable date', function () {
           var template = '<form name="timeForm">' +
               '<input ng-model="time" name="time" type="text" future-time/>' +
               '</form>',
           compiled = compileAndApply(template);

           // this appears to be how you fake an input change.
           compiled.find('input').val('not a date');
           compiled.find('input').triggerHandler('input');

           expect(scope.timeForm.$valid).toBeFalsy();
       });

       it('should be invalid on past date', function () {
           var template = '<form name="timeForm">' +
                   '<input ng-model="time" name="time" type="text" future-time/>' +
                   '</form>',
               compiled = compileAndApply(template);

           compiled.find('input').val('1998-01-01');
           compiled.find('input').triggerHandler('input');

           expect(scope.timeForm.$valid).toBeFalsy();
       });

       it('should be valid on future date', function () {
           var template = '<form name="timeForm">' +
               '<input ng-model="time" name="time" type="text" future-time/>' +
               '</form>',
           compiled = compileAndApply(template);

       compiled.find('input').val('2050-01-01');
       compiled.find('input').triggerHandler('input');

       expect(scope.timeForm.$valid).toBeTruthy();
       });
    });
});
Here we've unearthed directives, which are truly powerful. It's of utmost importance to write reusable and generic directives--the less reusable they are (say, by polluting scopes), the more of a maintenance nightmare you'll incur when revisiting them in the future, and you will wake up screaming.
Next we'll learn a bit more about directives: when to use them, how to write a reusable directive, how to use isolate scopes, and the difference between compilation and linking.
More About Directives
A directive either is some sort of HTML element (or comment) or it attaches itself to one. Directives don't make sense without HTML elements. If you want to interact with an HTML element, try using a directive. If you are doing anything else, don't.
Directives cannot directly "include" linking or compilation functions from other directives. They are not injectable. If you think you need to inject a directive, you're doing it wrong. Instead, you may write some HTML using the directive that actually calls another directive. An example of this is the accordion "widget" from earlier, which I'll repeat here:
blog.directive('accordion', function() {
  return {
    restrict: 'E',
    replace: true,
    template: '<div class="accordion"><h3>{{title}}</h3>' +
      '<div class="accordion-content" ng-show="open" ng-transclude></div>',
    transclude: true,
    scope: {
      title: '='
    },
    link: function(scope, elm) {
      scope.open = false;
      // assume we have no jQuery.
      angular.element(elm.children()[0]).bind('click', function() {
        scope.$apply('open = !open');
      });
    }
  };
});
----
The template of this directive has another two directives in it: ngShow and ngTransclude. That's how you include one directive in another. If you need to share functionality between directives, you can specify a controller that multiple directives can use--and they can even use this controller to talk to each other.
Reusable Directives
Continuing our discussion from earlier about widgets--if you want to write a reusable directive, there are some steps you should take. The first step is making sure you don't pollute any scopes. Here's an example of a directive that pollutes the scope:
myApp.directive('badDirectiveIsBad', function() {
  return function(scope, elm, attrs) {
    scope.foo = scope.$eval(attrs.badDirectiveIsBad);
  };
});
This is bad because we took <div bad-directive-is-bad="'bar'"/> and polluted the current scope with the foo model. If we have some controller in play, that controller's scope will now have foo in it, and any scope descending from that scope. Furthermore, if foo was a model in the scope, you have just blasted it away. Obviously this can be the source of bugs. We can avoid this.
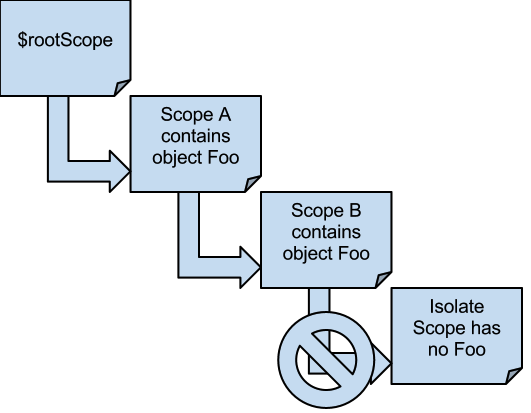
We avoid this by having our directive create its own scope. Well--that solves the problem of polluting the current scope, but not the parent scope. To avoid that problem, we create an isolate scope. An isolate scope differs from a normal scope in that it does not prototypically inherit from its parent. You can throw anything in an isolate scope without worry of it polluting any other scope.
The salient option is the scope property of the object returned by your directive. Set it, and you have an isolate scope. Here's a marginally useful example of a directive safely using an isolate scope, which we can add to our blog code:
// Debug directive helps you debug a little more nicely than normal.
// This could be accomplished with a filter as well.
// Usage:
// <debug val="foo"/>
// Output HTML:
// <debug val="foo"><pre>{{debug(expression)}}</pre></debug>
// .. where debug(expression) results in a pretty-printed JSON representation of the expression
// defined in @val.
blog.directive('debug', function() {
    return {
        restrict: 'E',
        scope: {
            expression: '=val'
        },
        template: '<pre>{{debug(expression)}}</pre>',
        link: function(scope) {
            // pretty-prints
            scope.debug = function(exp) {
                return angular.toJson(exp, true);
            };
        }
    };
});
Toss it somewhere in index.html, within the ContentCtrl <div>:
<debug val="posts"></debug>
You'll see you get a nice, preformatted and pretty-printed output of the value of $scope.posts from our ContentCtrl controller (note this won't work if you aren't using the default route, because only post is defined).
The scope property says, "put a model on the scope called 'expression' and make it whatever the evaluated value of the 'val' attribute was". I guess that's a bit of a mouthful, but if you try using this directive for yourself, you'll see it's quite simple.
The second parameter to angular.toJson() is a flag to pretty-print the output. When using <pre>{{posts}}</pre> you will get the value of posts alright, but it may be difficult to read.
Finally, we declared this debug() function on the scope. This function does not appear in the current scope or parent scope. Thus, if we had defined a function called debug in ContentCtrl somewhere, they would not conflict.
Note that if posts changes at any time, because we have linked it using the = operator in the isolate scope definition, the output of this directive is data-bound and will update.
You can also declare an isolate scope with scope: true or scope: {}; either of these will give you an empty scope. This is useful if you don't need to evaluate any expressions or attributes between your parent scope and the directive.
Directive Controllers
Directives can have controllers. Directives can reuse one controller between them. You can do some interesting things with this; two directives of different kinds can essentially "talk" to each other in this manner. Check this out:
// controls formattedDebug and looseDebug directives.
blog.controller('DebugCtrl', function ($scope, $element) {
    var minimized = false;

    // pretty prints a debug
    this.debug = function (exp) {
       return angular.toJson(exp, true);
    };

    // toggles hidden/shown
    this.toggle = function () {
       if (minimized) {
          $element.find('div>div').show({duration: 1000});
       } else {
          $element.find('div>div').hide({duration: 1000});
       }
       minimized = !minimized;
    };
});
We'll see formattedDebug and looseDebug defined below. You'll notice this is especially strange because of the lack of $scope. That's intentional. Using this in a controller puts a function or variable on all instances of that controller. However, it's not available to the scope, and thus not available to any view or template.
You do see an $element injected into this controller. This is special and is not injectable elsewhere besides in directive controllers. Remember how I said to never do DOM manipulation in a controller? That does not apply to directive controllers. You can go wild with it in these, as you can see above. I'm using some jQuery to do show/hide animations. Let's continue with the directives themselves:
// sets an area in which preformattedDebug and looseDebug may talk to each other
blog.directive('debugZone', function () {
    return {
        restrict: 'E',
        controller: 'DebugCtrl'
    };
});
This directive uses the DebugCtrl controller above. Anything directive within this directive can require the debugZone directive to get access to the DebugCtrl controller. As with passing ngModel into a linking function, you can now pass in debugZone. And we'll do that.
// displays a debug in a <pre>
blog.directive('preformattedDebug', function () {
    return {
        restrict: 'E',
        scope: {expression: '=val'},
        template: '<div><button ng-click="toggle()">toggle debugs</button> <div><pre>
{{debug(expression)}}</pre></div></div>',
        require: '^debugZone',
        link: function (scope, elm, attrs, debug) {
            scope.debug = debug.debug;
            scope.toggle = debug.toggle;
        }
    };
});

// displays a debug in a <div>
blog.directive('looseDebug', function () {
    return {
       restrict: 'E',
       scope: {expression: '=val'},
       template: '<div><button ng-click="toggle()">toggle debugs</button> <div>
{{debug(expression)}}</div></div>',
       require: '^debugZone',
       link: function (scope, elm, attrs, debug) {
           scope.debug = debug.debug;
           scope.toggle = debug.toggle;
       }
    };
});
And before we get any further, the markup looks like this:
<debug-zone>
    <preformatted-debug val="posts"></preformatted-debug>
     <loose-debug val="posts"></loose-debug>
</debug-zone>
----
Note the caret (^) within the require property. This says "you can look in the parent scope for the directive you are requiring." Since these dudes have isolate scopes, they need to look in the parent scope; this happens to correspond to the parent tag, which is <debug-zone>.
Common functionality between directives
If you have similar directives, it may be a good idea to reuse functions. For example, two directives with a common link method, or two directives putting the same function into their scopes. The best way I've found to deal with this is to simply create a service or factory and share the functions by good ol' dependency injection.
The purpose of putting <debug-zone> around these two is to allow them to both use the same instance of a controller. The linking functions in both, obviously violating DRY (don't repeat yourself) principles, simply grab some functions out of the directive controller and put them into the scope, so the directives' templates can use them (we could avoid needing to do this by putting the debug and toggle functions into the injected $scope and not using isolate scopes, but let's keep it this way for sake of example).
Since these two directives share one instance of the controller, what happens is any interaction with that controller by either template can cause the other to change its behavior. In practice, this means when you click the "toggle" button on either directive, it closes both of the directives, because they share the same "minimized" flag!
You could likely simulate this type of behavior by throwing functions into parent scopes and calling them from within scope member directives, but in large applications it can become crucial to limit the amount of information in the scope--especially if you are nesting a lot of controllers. This technique allows directives to interact without having to put anything at all in the scope hierarchy.
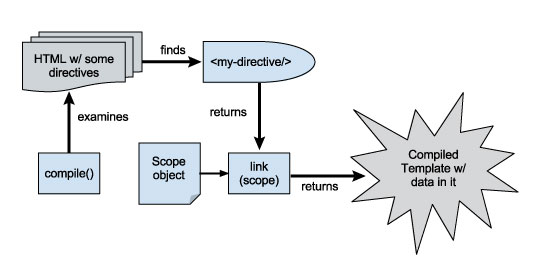
Compilation vs. Linking
Sometimes you will want to specify a compile function instead of a link function. You will supply one but not both. If you supply a compile function you will expected to return a linking function from this.
What's the difference? In simplest terms, compilation does not have a scope, and happens before linking does. If you do not need a scope in your directive, then use a compile function; this will be faster. If you need to modify a template for whatever reason, use a compile function. But, 9 times out of 10 you will want to use link, because you probably care about what's going on in the scope.
Conclusion
A detailed explanation of the difference between compilation and linking is available in the AngularJS developer's guide.
Due to the godlike power of directives, their use comes at a cost. It's not the world's steepest learning curve, but do not kick yourself in the face if you can't figure it out on the first pass. Read other directives, like those supplied by the Angular-UI project (http://angular-ui.github.com); see how they work. Play around with them on Plunker (http://plnkr.co) or JSFiddle (http://jsfiddle.net). And when you have harnessed the thunder, release your work for other developers. Chances are you will have written a directive somebody else could use.
Next you will learn about services, factories and providers.