iOS 7 Open Source Bleeding Edge
About the Open Source Libraries
Introduction to Open Source
The success of the iOS and iPhone ecosystem has been built on the pillars of the strength of the iOS development platform, which has in no small part at all been aided by the continuing prominance of the iOS open source community. With great tools such as the social coding platform Github rising to prominance, it has made sharing and social-contribution of code easy and fun.
In production and development, open source as a development model promotes a) universal access via free license to a product's design or blueprint, and b) universal redistribution of that design or blueprint, including subsequent improvements to it by anyone.[1][2] Researchers view open source as a specific case of the greater pattern of Open Collaboration, "any system of innovation or production that relies on goal-oriented yet loosely coordinated participants, who interact to create a product (or service) of economic value, which they make available to contributors and non-contributors alike".[3] (For a more complete definition of open source, refer to http://opensource.org/osd)
Developing an app has never been easier, with the aid of freely-licensed code that you can use to build your app, from fancy animatable UI components, to networking frameworks. Rather than worry about how to build something uniique, you can freely use someone else's code, provided you provide the proper attribution, and even contribute back into the shared code-base, as a gesture of good-will. In fact, the spirit of open-source, and an unwritten code of conduct amongst iOS developers is, if you use someone else's code, give him or her credit, if you augment that person's code and make it even more useful, share it back.
The remainder of this chapter will discuss various tools and practices that will aid you in structuring and managing your list of embedded open source libraries that you will be using in your XCode project, with the aim of making sure you become a good iOS open source citizen.
What is CocoaPods
Introducing CocoaPods, a very useful ruby-powered tool that will aid you in managing your open-source code-snippets. There are a few ways in which you could utilise existing open-source code. You could manually download a repository and put the code directly into your project, in which case you break the git link, meaning you can't rely git to get repository updates, which could be problemmatic down the road.
You could also use git submodules, which I will discuss seperately later on in this chapter, and checkout the repository as a sub-module, which is a better option, but if you are going to use tons of open-source repositories or modules in your project, managing them could become difficult. Having to update, build static libraries, controlling which version of which library you want to implement (and that may not be the latest version) and so on. This is where CocoaPods comes in, a convenient and neat dependency-manager tool that gives you access to thousands of libraries, at your fingertips.
CocoaPods is the dependency manager for Objective-C projects. It has thousands of libraries and can help you scale your projects elegantly.
Having a tool that manages all the dependencies between your libraries, and any dependencies in-between libraries, allows you to concentrate on the important bits of your project, leaving the manager to fetch the appropriate source-code, maintain the right build environment, with minimal effort, as you will soon see.
Whether you decide to finally implement all your projects in CocoaPods is something for you to decide, but certainly not essential, and this book certainly isn't centred around the use of CocoaPods, but for many, this sure makes life easier.
Setting up CocoaPods
As previously mentioned, CocoaPods is built with ruby, and you therefore need to have the ruby environment installed, before you can use this depdendency-management tool. But don't schvitz, Mac OS X comes with ruby pre-baked, so all you need to do is make sure your ruby-gems are up-to-date, by running the following command in terminal:
sudo gem update --system
If all is well so far, the next step is to actually install CocoaPods:
sudo gem install cocoapods
pod setup
Now, in terminal, go to your XCode Project directory and create a file, called Podfile. You can either do it in terminal using nano, or use my favourite code-authoring tool, TextMate, The Podfile is the main file you concern yourself with, and declare which libraries you wish to use.
platform :ios
pod 'JSONKit',       '~> 1.4'
pod 'Reachability',  '~> 3.0'
The bit of code above simply states you want to use two libraries, JSONKit and Reachability. You also set which branch versions you wish to implement up to. Remember, you can always add to this file later on, so nothing is set in stone. When you are ready to let CocoaPods do it's magic, in terminal you type the following:
pod install
That's all there is to it, it finds the appropriate libraries from github and delivers them to your project. Remember, each time you do an update to the CocoaPod, run pod install.
When it's done downloading the appropriate libraries, it has also created an .xcodeworkspace for you to open up, instead of using the .xcodeproject environment. This is very important, something you should remember. And when you do open up the workspace, you will see an extra work-space with all the appropriate cocoapods.
Using CocoaPods
Having just explained how to install cocoapods and put one or two well-known libraries into your project, it's important for you to know how to find and add the repositories you need for your project. Unfortunately, not every open-source library is compatible with cocoapods, they have to implement a few certain things in their repository, for the project to be pod-compliant. But as of writing, a huge proportion of open-source libraries are available, and more coming on board every day.
So, to search for a pod to add to your project, you can do it in one of a few days. If you are in terminal, you can type
pod search projectname
and it will find anything that matches your search string.
...
-> AFNetworking-ReactiveCocoa (0.0.2)
Make AFNetworking reactive.
pod 'AFNetworking-ReactiveCocoa', '~> 0.0.2'
- Homepage: https://github.com/uasi/AFNetworking-ReactiveCocoa
- Source: https://github.com/uasi/AFNetworking-ReactiveCocoa.git
- Versions: 0.0.2, 0.0.1 [master repo]
You can also go to cocoapods.org and search there, as is illustrated below:
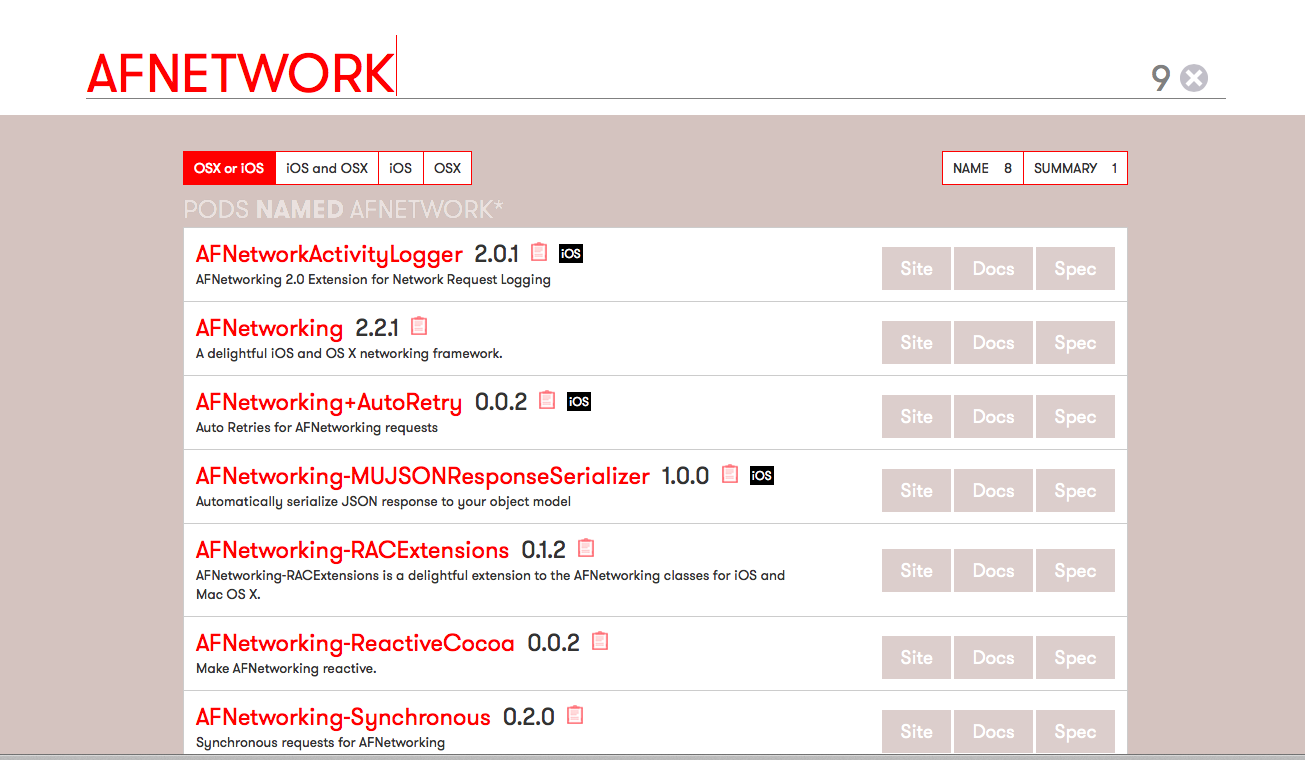
The name in red is the actual name of the library you put in your pod, with the revision number, the latest revision the project is up to. You can inspect it's github repository for different versions and branches you wish to implement. In fact, you don't even have to specify a version, if you want CocoaPods to assume you are okay with having the latest version available.
#TODO insert a block on Dash, complete with a screenshot, inline
Forking CocoaPods (using your own repo)
Whilst most of the time you would probably be working with public Github repositores, there may be a time when you want to work with a forked version of a public open source library, as opposed to the original source itself. To do that is quite easy and certainly worthwhile... You would presumably have already have forked your own github library, in which case you then perform the following steps:
- Make any changes and push the changes back to your fork;
- Modify your Podfile to point to the correct forked repository location;
- Get your last commit, in fact the SHA of your last commit, by going to the commit section on Github and copy SHA.
- You update your Podfile to look like something below:
pod 'https://github.com/myname/TheProject.git', :commit=> 'd35783339saas21218rsar2f2212112xxxxSHA'
Where the last part is the SHA of your previous commit. Well not quite simple, but a little bit of effort and you can get a lot more out of CocoaPods. There in fact other ways in which you can work with CocoaPods, including working with private modules that you share across projects, which is outside the scope of this book, but if you make your way over to http://guides.cocoapods.org, you will find some useful ideas on other ways in which you can utilise CocoaPods.
Resource: http://guides.cocoapods.org/making/private-cocoapods.html
Introduction to CocoaDocs
CocoaDocs is quite a simple website, that goes hand-in-hand with CocoaPods, but not necessarily a pre-requisite. CocoaDocs is the 'Google' search engine of Objective-C libraries, allowing you to search horizontally as well as vertically across APIs and API methods and documentation. It's quite easy and convenient to use, and even more-so, when you also use a nifty little app called Dash, by Kapeli (http://kapeli.com). With Dash, you get a quick-fire way to look up documentation offline, and this isn't just restricted to Objective-C, but pretty much anything, from javascript libraries to .NET and so on.
With Dash, you can navigate CocoaPods to a specific library, and if you want to capture that library documentation for offline access, you simply press the little icon on the top-right and it will add it to your Dash list of libraries. In fact, from there-in, it actually updates your documentation whenever there is an update-online for you. Certainly worthy of being part of your development toolkit.
Structuring your project with submodules
Working with Cocoapods delivers an array of benefits to your development workflow, from collecting and managing specs of projects, notifying you of any updates to a project, how to integrate the API into your project, and setting up the project build settings. However, working with cocoapods isn't mandatory and this book certainly isn't going to cucify anyone who doesn't. Perhaps a project you need is on Github but isn't CocoaPos compliant, which is quite plausable.
Introducing Git Submodules, a fantastic git feature that allows you to essentially nest a git repository or a few, within your own git repository. That is, you can manage a list of repositories that you rely on for specific API projects, and update and pull those sub-repositories (or sub-modules) independently of your main project. If you wanted to change something in that sub-module, you can commit and push that back. This certainly is preferable to just manually downloading an API and placing it on your project, where that git chain would then be broken, as it would be out of it's origin repository. Whilst this book will point out CocoaPod links for libraries I discuss, you can certainly opt to work with it as submodule instead, just as easly.
How to work with git submodules is outside the scope of this book though, and you can readily find more information on what git submodules are in greater detail, as well as how to implement submodules in your project, by going to: http://git-scm.com/book/en/Git-Tools-Submodules.
Attributing Credit to Open Source Libraries & abiding by the licensing terms
All that talk about CocoaPods and the easy in which you can pick and choose specific libraries, like a smorgasbord, gives you all that power, but with great power comes great responsibility. The aim of this last section is to teach you how to become a great open source citizen, and this goes beyond even the legal responsibilties, and in fact touches on the morality of using someone's code without giving them due credit.
All CocoaPod libraries should have a license reference on the terms of it's license, which is a moral contract that informs you that in return for using his or her code in your app, you should abide by the rules and terms s/he sets out. These terms are usually found in the readme or some markdown file embedded within the repository, and for you, you either abide by the library author's terms or don't use their code, as simple as that.
You could face a legal dispute if you break the terms of the license, and even if you don't get hounded by the author's lawyers, using someone's code against his or her wishes considering you are using their code for free is quite poor form in itself.
According to a great article written by the Big Nerd Ranch (http://blog.bignerdranch.com/4638-using-cocoapods-without-going-court/), even if you can't find a specific license section in the README or LICENSE markdown file in the code-base, there is a de-facto default license that applies, whereby the author has exclusive rights to the work.
That's the assumption you go by. It also helps to understand the different types of licenses that are out there. Most licenses for instance ask you at the very least to preserve the copyright and licensing terms placed in the header files of the lbirary classes, which is a fair assumption you will be asked to do at the very least. Some people decide to copy and paste all the license terms from all the pod files/libraries into a single file, for bravity, making it easier for others to find concisively where all the terms and conditions are.
The most common licenses you will find are:
- MIT/X11 License (link);
- 3-clause New BSD license (link);
- 2-clause Simplified BSD license (link);
- 1-clause BSD license (link);
Apache 2.0 license additionally asks that any modification to the original library code be explicitly noted, through a common notation such as MODIFIED 2014 BY DORON KATZ, for example.
There are many more licenses that you would benefit from learning about, which outside the scope of this book, but thankfully, CocoaPods include a special type of generator script that allows you to easily generate an acknowledgement sectioon, from the various pod references you have specified in your PodFile, which is detailed thoroughly in the CocoaPods wiki documentation.